HTML5 Game Tutorial: Game UI – Canvas vs DOM

In this last tutorial on making an Endless Runner style game, we’ll discuss the different approaches for making our games user interface (UI), the pros and cons to each approach, and then finish by creating the UI for our game and adding music.
Code: https://github.com/straker/endless-runner-html5-game/tree/master/part3
Part 3
To being, let’s take a look at the final product we will be creating in this tutorial. Click inside the game if the controls aren’t working.
Controls: Jump – Spacebar
As you can see, we’ve added a loading screen while the games assets are loading, a menu screen for starting the game, and a game over screen when the player dies. We’ve also added a credit screen so that everyone gets attributed for the assets we’ve used. We’ve also added music to the game and a way to mute the music if it ever gets annoying.
The Game UI
Before we can add the UI to the game, we need to discuss the different approaches to creating a games UI.
There are two primary methods for drawing UI to the screen: using the canvas to draw the UI or using native DOM elements and CSS.
Canvas or DOM
Everyone seems to be split on whether or not to create the UI for a game using canvas or native DOM elements. It seems the answer always gravitates towards it depends. I wasn’t happy with that answer, so I’m going to give a definitive answer on the subject of canvas vs DOM UI. Here it is:
It depends.
Yep, that’s the definitive answer. The reason for this is that how you render your UI largely depends on what you want to do with your game.
If you’re planning on using a framework to port your game to a native app (such as Cocoonjs), it might require that all your UI be canvas based. If you were to use DOM elements, your UI wouldn’t show up. However, if you are just planning on having your game played in the web, or your framework doesn’t have a restriction, then you can use either canvas or DOM elements for your UI.
To help you decide which route you should take, we’ll discuss both approaches in detail.
DOM Based UI
There are several reasons why using DOM based UI is better than using the canvas:
- DOM handles all the interactivity of UI for you
- DOM based UI lends itself to less code
- UI is separate from your animation loop making your code faster
To demonstrate these points, we’ll create a simple button with hover and active states in both DOM and canvas.
UI Interactivity
If you were to create the button in canvas, you would have to handle all the button events yourself. This means that you need to write all the code to handle any hover, focus, active, or click events.
DOM elements on the other hand handle all of this for you. Creating hover and active states is trivial.
File Size
DOM based UI also lends itself to writting less code. All that extra code you have to write for button states when using the canvas obviously increases the file size.
<!DOCTYPE html><html><head><title>Button vs Canvas Test - Buttons</title><style>body{margin: 0;}</style></head><body><canvas id="canvas" width="200″ height="200″><script>(function(){function r(r,i,s,o,u,a){this.x=r;this.y=i;this.width=s;this.height=o;this.colors=a;this.text=u;this.state="default";this.update=function(){if(t.x>=this.x&&t.x<=this.x+this.width&&t.y>=this.y&&t.y<=this.y+this.height){this.state="hover";if(n){this.state="active"}}else{this.state="default"}};this.draw=function(){e.save();var t=this.colors[this.state];var n=this.height/2;e.fillStyle=t.top;e.fillRect(this.x,this.y,this.width,n);e.fillStyle=t.bottom;e.fillRect(this.x,this.y+n,this.width,n);var r=e.measureText(this.text);var i=this.x+(this.width-r.width)/2;var s=this.y+(this.height-15)/2+12;e.fillStyle="#FFF";e.fillText(this.text,i,s);e.restore()}}function s(){requestAnimationFrame(s);i.update();i.draw()}var e=canvas.getContext("2d");e.font="15px sans-serif";var t={x:0,y:0};var n=false;canvas.addEventListener("mousemove",function(e){t.x=e.offsetX||e.layerX;t.y=e.offsetY||e.layerY});canvas.addEventListener("mousedown",function(e){n=true});canvas.addEventListener("mouseup",function(e){n=false});var i=new r(50,50,100,50,"Play",{"default":{top:"#1879BD",bottom:"#084D79″},hover:{top:"#678834″,bottom:"#093905″},active:{top:"#EB7723″,bottom:"#A80000″}});requestAnimationFrame(s)})() </script></body></html>
<!DOCTYPE html><html><head><title>Button vs Canvas Test - Buttons</title><style>.button{width: 100px;height: 50px;line-height: 50px;position: absolute;left: 50px;top: 50px;color: #FFF;text-decoration: none;background: linear-gradient(#1879BD 50%, #084D79 50%);text-align: center;font-size: 15px;font-family: sans-serif;}.button:hover{background: linear-gradient(#678834 50%, #093905 50%);}.button:active{background: linear-gradient(#EB7723 50%, #A80000 50%);}</style></head><body><a href="#" class="button">Play</a></body></html>
The canvas button almost triples the minified size of the DOM button and about doubles the gzipped size.
Performance
Because DOM based UI doesn’t have to be updated and redraw inside the animation loop, it also doesn’t slow down the FPS as much as canvas based UI.
As a simple test, we’ll add 100 buttons to the screen in both DOM and canvas and see what happens to the frame rate. I’ll move my mouse around the screen and interact with the buttons to trigger repaints and animation events.
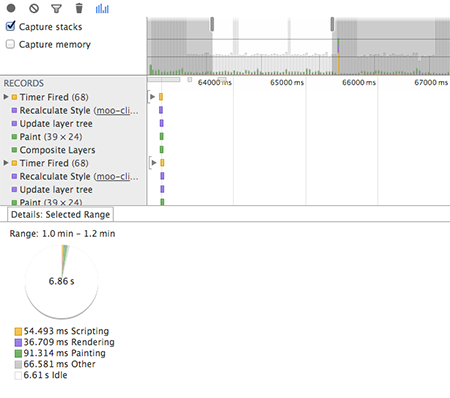
We’ll start with 100 DOM buttons:
View the code on jsFiddle.
Even with 100 DOM buttons the FPS stays above 60FPS (the bottom line in the graph). After 6 seconds the browser has spent very little time having to render and repaint the screen.
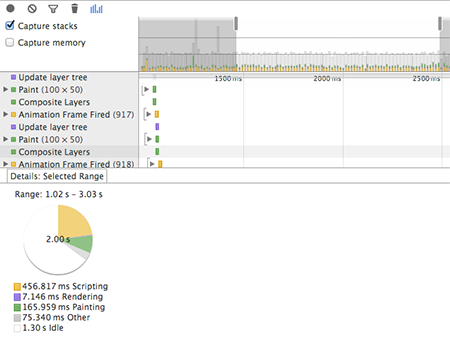
Now we’ll do the same thing with canvas buttons:
View the code on jsFiddle.
As you can see, with 100 canvas buttons the browser is having to do a lot more work.
In 2 seconds, the browser had to spend on average 4.39 ms to run the animation loop. That may not seem like a lot, but when you consider that to achieve 60FPS, your animation loop has to run in less than 17 ms (1000 ms / 60 = 16.6), 4.39 ms is about a fourth of the targeted time!
Having to check every button every frame to see if the user is interacting with it costs precious resources, resources that could be spent rendering your game.
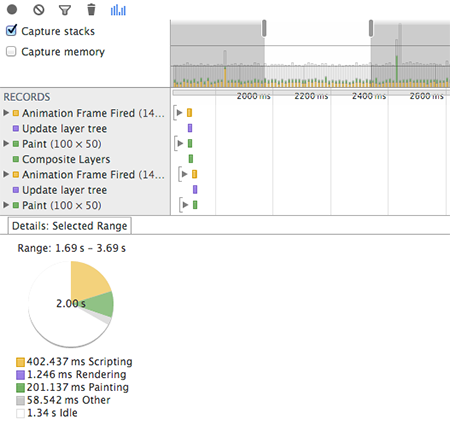
As a final test, we’ll draw 100 DOM buttons on top of the canvas with 100 canvas buttons and see what that does. This should let us see what happens when a game uses DOM based UI while running a game.
View the code on jsFiddle.
The FPS didn’t really change that much over 2 seconds from just the 100 canvas buttons. The browser still had to use on average 4 ms to run the animation loop, but the DOM buttons didn’t really change the rendering or repainting of the screen.
Granted, you probably won’t have 100 canvas UI elements on the page at a time. However, it’s good to know that creating UI elements in the canvas does come with a small price.
Canvas Based UI
Even though creating the UI with DOM elements may seem like the better solution, it does have it’s own difficulties.
It’s Harder to Match Style
If we look at the button we used for the previous examples, it probably doesn’t really match the style of any game. It’s rather simple and doesn’t look all that good.
Most of the time, you’ll want your UI to match the theme and style of your game. A lot of the time, this style has already been created in the code for your game, and all you need to do is tweak the code to use it for the UI.
As an example. In a recent game I made, I already had the code to generate a button that could look similar to this one:
This type of UI can’t be done with CSS and just one DOM element, it’s just far too complex. If I wanted to try to create this button in the DOM, I would have to use a lot of complex techniques that probably wouldn’t be worth it.
So how can we use the code to create a UI that matches our games style without having to use canvas based UI? I’m glad you asked.
Canvas to DOM UI
The answer is to create your UI in the canvas and then save them as a spritesheet so that the DOM elements can use it as a background image.
We first create the three button states in the canvas sitting side by side (outlined in red). Notice that the Button function doesn’t have any update or draw functions. This is because we will just draw the button to the screen and then never do anything with it again.
There are two ways you can generate the background image. The first is the simplest. Just right click on the canvas and choose “Save Image As.” This will allow you to save the entire canvas as an image. Once you have the image, you can use it to create a CSS rule that uses it as a background image for your UI.
The second approach is to use the built in JavaScript function canvas.toDataURL() to save the canvas as a base64 encoded image string. We can then create a new stylesheet on the page and add a rule for the button to use the dataURI as the background image.
Once we have the style for the button, we can then use CSS to offset the position of the spritesheet for each state. And now we have a working DOM based UI while still matching the style of our game.
Better still, once you’ve generated the stylesheet with the spritesheet dataURI, you can just save the rule into your normal stylesheet and delete all the code that generated the spritesheet. This means that you don’t have to spend time while the game is loading generating the UI every time.
The downside to this approach is that you’ll be adding an asset that the user will have to download. The image created for that button is about 19KB whereas the baes64 encoded string is extremely long and also adds an additional 19KB to your CSS file.
It Doesn’t Scale
When you create a UI using the canvas, it’s really easy to scale that UI with the game to fit different screen sizes. All you have to do is use CSS to scale the canvas and the UI automatically scales with it.
This is where canvas based UI beats DOM based UI. It is far easier to scale canvas based UI than it is to scale DOM based UI. There’s a bit more planning and complexity involved with trying to do this in the DOM.
To scale the DOM, you can either use media queries to change the size of the DOM at certain breakpoints or you can work in percentages (such as using a CSS grid technique). To get the same feel as scaling the canvas UI, you’ll probably wan’t to try the grid based approach, but even that will not have the same feel.
The Main Menu
Now that we’ve discussed the pros and cons to each UI approach, it’s time to make our games UI.
The first menu we’ll create is the main menu that players will see when they want to play the game.
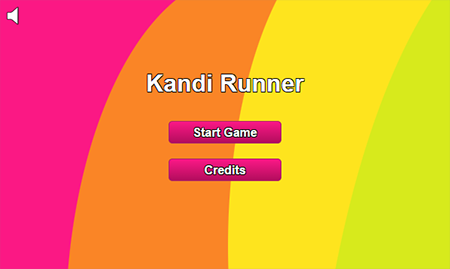
The menu is relatively simple, just the title and two buttons plus the background image. Since the buttons are also simple, I can create them either using the canvas or using DOM elements. I’m not planning on making the game responsive, so I’ve chosen to make them in the DOM to save some coding time.
<!DOCTYPE html>
<html>
<head>
<meta charset="UTF-8″>
<title>Kandi Runner</title>
<link rel="stylesheet" href="kandi.css" type="text/css" media="screen">
<script type="text/javascript" src="jquery.2.1.1.min.js"></script>
</head>
<body>
<div class="wrapper">
<div id="menu" class="main">
<div id="main">
<h1>Kandi Runner</h1>
<ul>
<li><a href="#" class="button play">Start Game</a></li>
<li><a href="#" class="button credits">Credits</a></li>
</ul>
</div>
</div>
<canvas id="canvas" width="800" height="480">
<p>You're browser does not support the required functionality to play this game.</p>
<p>Please update to a modern browser such as <a href="www.google.com/chrome/">Google Chrome</a> to play.</p>
</canvas>
</div>
<script type="text/javascript" src="kandi.js"></script>
</body>
</html>
The main menu sits within it’s own div so that we can restrict it’s size to match the canvas. I like to make menus using unordered lists as this is a habit of mine from creating websites. They aren’t necessary here and you can easily just use the anchor tags without them.
Both the anchor tags have javascript:void(0); as the href. Browsers allow you to create href’s that use javascript code by prefacing the code with the word javascript:. By using void(0); we are telling javascript to do nothing, thereby making the link do nothing.
We could also use a button here instead of an anchor tag, but I find overriding the default styling of buttons to be a bit more tedious than anchor tags.
Next up is the CSS for the menu.
*, *:before, *:after {

  box-sizing: border-box;

}
#menu.main {

  background-image: url('imgs/menu-bg.png');

}
#main {

  display: none;

  height: 60%;

  overflow: auto;

  margin: auto;

  position: absolute;

  top: 0; left: 0; bottom: 0; right: 0;

}

#main h1 {

  color: white;

  text-shadow: -1px -1px 0 #000, 1px -1px 0 #000, -1px 1px 0 #000, 1px 1px 0 #000;

}
.button {

  display: block;

  width: 150px;

  margin: 0 auto;

  height: 30px;

  line-height: 30px;

  border: 1px solid #AA2666;

  color: white;

  font-weight: bold;

  text-shadow: -1px -1px 0 #000, 1px -1px 0 #000, -1px 1px 0 #000, 1px 1px 0 #000;

  background-color: #FB1886;

  background-image: -webkit-linear-gradient(bottom, #FB1886 0%, #B30D5D 100%);

  background-image:         linear-gradient(to bottom, #FB1886 0%, #B30D5D 100%);

  border-radius: 5px;

}

.button:hover {

  background-color: #B30D5D;

  background-image: -webkit-linear-gradient(bottom, #B30D5D 0%, #FB1886 100%);

  background-image:         linear-gradient(to bottom, #B30D5D 0%, #FB1886 100%);

}
First, we give every element on the page box-sizing: border-box. This ensures that the sizes we declare in CSS stay that size, which is very helpful.
After we set the background image for the menu, we set the size of the menu div to about half the size of the canvas and use position: absolute; left: 0; right: 0; top: 0; bottom: 0; to vertically center the menu to the game.
Lastly, we create the styling for the title of the game and the buttons. The text-shadow property is being used to give the white text a black border so that it sits better against the purple gradient.
With the menu in place, we now need to write the JavaScript to start the game when the player clicks on the Play button.
/**

 * Load the main menu

 */

assetLoader.finished = function() {

  mainMenu();

}
/**

 * Show the main menu after loading all assets

 */

function mainMenu() {

  $('#main').show();

}
/**

 * Click handlers for the different menu screens

 */

$('.play').click(function() {

  $('#menu').hide();

  startGame();

});
Because we are no longer starting the game once all assets have loaded, we need to change which function is called in assetLoader.finished(). The new mainMenu function shows the menu when all assets are loaded so that we can’t hit the play button before the game is ready.
We then create a click handler on the play button which hides the menu and then starts the game.
For this game, I’m using jQuery to manipulate the DOM. However, this was probably a bad decision since all I’m doing with jQuery is hiding and showing DOM elements and adding click handlers. This can be done in native JavaScript just as easily and without the need of an extra library. Unfortunately, jQuery was kind of a crutch for me and so I always included it even when I didn’t need to.
If you’re wondering what that would look like in native JavaScript, here is how I would do it.
var main = document.getElementById('main');
/**

 * Hide element

 */

function hide(el) {

  el.style.display = 'hide';

}
/**

 * Show element

 */

function show(el) {

  el.style.display = 'block';

}
/**

 * Show the main menu after loading all assets

 */

function mainMenu() {

  show(main);

}
/**

 * Click handlers for the different menu screens

 */

document.querySelectorAll('.play')[0].addEventListener('click', function() {

  hide(main);

  startGame();

});
The Game Over Screen
Next, we’ll create the game over screen that will let the player restart the game if they die. We’ll put it right after the canvas tag.
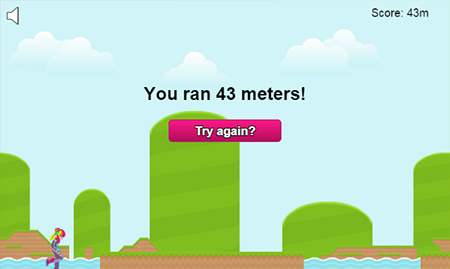
    <!-- /canvas -->

    <div id="game-over">

      <h2>You ran <span id="score"></span> meters!</h2>

      <a href="javascript:void(0)" class="button restart">Try again?</a>

    </div>
#game-over {

  display: none;

  text-align: center;

  padding-top: 92px;

  z-index: 1;

  width: 600px;

  height: 360px;

  overflow: auto;

  margin: auto;

  position: absolute;

}
/**

 * End the game and restart

 */

function gameOver() {

  stop = true;

  $('#score').html(score);

  $('#game-over').show();

}
/**

 * Click handlers for the different menu screens

 */

// …

$('.restart').click(function() {

  $('#game-over').hide();

  startGame();

});
In the game over screen, we’ll let the player know how far they got and then let the restart the game. By using a span tag, we can put the score from the game into the text when the player dies.
Unlike the menu screen, we don’t want to vertically align the game over screen to the game. This is because the text is easier to read if it’s in front of the light blue sky and not in front of the one of the green background hills. So we’ll just adding padding to the top until it’s at a level that looks nice.
The Loading Screen
It’s nice to let the player know that the game is loading assets so that they don’t think the game is just broken when starting it up. It’s even better to show the player the progress of this loading so that they can judge how long it’s going to take.
To do this, we’ll create a simple loading screen with a progress bar to indicate how many assets have currently loaded. We’ll add it right before the main menu div.
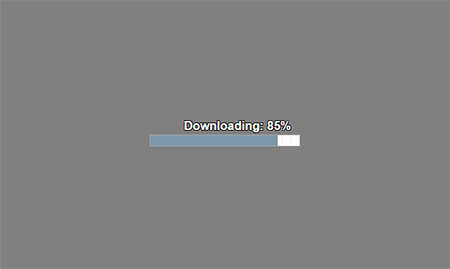
      <div id="progress">

        <div id="percent">Downloading: <span id="p"></span></div>

        <progress id="progress-bar" value="0″></progress>

      </div>

      <!-- div id="main" -->
#progress {

  height: 12%;

  margin: auto;

  position: absolute;

  top: 0; left: 0; bottom: 0; right: 0;

}

#percent {

  color: white;

  font-weight: bold;

  text-shadow: -1px -1px 0 #000, 1px -1px 0 #000, -1px 1px 0 #000, 1px 1px 0 #000;

}

#progress-bar {

  width: 200px;

}
We’re using an HTML5 progress element to get a simple progress bar. This let’s us get a simple progress loader without too much work.
// assetLoader

  /**

   * Ensure all assets are loaded before using them

   * @param {number} dic  - Dictionary name ('imgs', 'sounds', 'fonts')

   * @param {number} name - Asset name in the dictionary

   */

  function assetLoaded(dic, name) {

    // don't count assets that have already loaded

    if (this[dic][name].status !== 'loading') {

      return;

    }
    this[dic][name].status = 'loaded';

    assetsLoaded++;
    // progress callback

    if (typeof this.progress === 'function') {

      this.progress(assetsLoaded, this.totalAssest);

    }
    // finished callback

    if (assetsLoaded === this.totalAssest && typeof this.finished === 'function') {

      this.finished();

    }

  }
// before assetLoader.finished()

/**

 * Show asset loading progress

 * @param {integer} progress - Number of assets loaded

 * @param {integer} total - Total number of assets

 */

assetLoader.progress = function(progress, total) {

  var pBar = document.getElementById('progress-bar');

  pBar.value = progress / total;

  document.getElementById('p').innerHTML = Math.round(pBar.value * 100) + "%";

}
/**

 * Show the main menu after loading all assets

 */

function mainMenu() {

  $('#progress').hide();

  $('#main').show();

  $('#menu').addClass('main');

}
Since we want to know when an asset has loaded, we’ll modify the assetLoaded() function inside the asset loader to call the progress() function if it exists. Inside this function, we’ll determine the percent of assets loaded to total assets and set the progress bar value and the text to this value.
We also need to hide the loading screen once all assets have loaded, so we’ll modify the mainMenu() function to do that before we show the menu. Lastly, we add the class main to the menu div which shows the main menu’s background image instead of the gray loading screen image.
The Credit Screen
The last screen we will add is the credit screen.
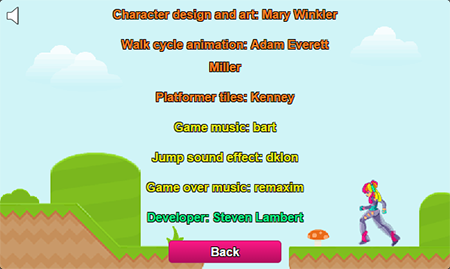
Any time you use assets that you didn’t make (art, music, etc.), you should credit the person who created them in your game. The person who made the asset determines how they wish to be attributed, so you’ll need to comply with what they ask to be able to use it in your game.
For example, I like to use opengameart.org for my art and music needs. If we look at the platformer tiles used for the game, you’ll see that the author would like a link to their website, although they say it’s not mandatory for this asset. I like to always attribute the authors of the assets I use because I think it’s good form.
It’s also a good idea to credit yourself as well somewhere in your game so others can find you if they like your game.
We’ll add the credit menu right after the main menu and right before the canvas.
      <!-- /main -->

      <div id="credits">

        <ul>

          <li class="artwork">Character design and art: <a href="http://www.acrylicana.com/">Mary Winkler</a></li>

          <li class="artwork">Walk cycle animation: <a href="http://vimeo.com/hellostudios">Adam Everett Miller</a></li>

          <li class="artwork">Platformer tiles: <a href="http://www.kenney.nl/">Kenney</a></li>

        </ul>

        <ul>

          <li class="music">Game music: <a href="http://opengameart.org/content/jump-and-run-8-bit">bart</a></li>

          <li class="music">Jump sound effect: <a href="http://opengameart.org/content/platformer-jumping-sounds">dklon</a></li>

          <li class="music">Game over music: <a href="http://opengameart.org/content/lose-music-3">remaxim</a></li>

        </ul>

        <ul>

          <li class="developer">Developer: <a href="/">Steven Lambert</a></li>

        </ul>

        <a href="javascript:void(0)" class="button back">Back</a>

      </div>

    </div>

    <!-- canvas-->
I’ve split the credit screen into three groups: those that provided artwork, those that made the music, and myself as the developer. Each group has their own color to make it obvious that there are three groups.
We also need to provide a back button so that players can get back to the main menu from the credits screen.
#credits {

  display: none;

  line-height: 30px;

  margin: auto;

  position: absolute;

  top: 0; left: 0; bottom: 0; right: 0;

}

#credits li {

  padding: 5px 0;

}
.artwork, .music, .developer {

  text-shadow: -1px -1px 0 #000, 1px -1px 0 #000, -1px 1px 0 #000, 1px 1px 0 #000;

}
.artwork {

  color: #fa8526;

}

.music {

  color: #e6e71f;

}

.developer {

  color: #13eb8a;

}
.back, .back:hover {

  margin-top: 10px;

}
/**

 * Click handlers for the different menu screens

 */

// …

$('.credits').click(function() {

  $('#main').hide();

  $('#credits').show();

  $('#menu').addClass('credits');

});

$('.back').click(function() {

  $('#credits').hide();

  $('#main').show();

  $('#menu').removeClass('credits');

});
The JavaScript just shows or hides the main menu and the credit screen based on which buttons were clicked.
Adding music
Now that we have all the menus for our game, the last thing we need to do is add music and sound effects.
Typically, when I’m looking for music to go with a game, I open the game in it’s own window so that I can listen to the music while the game is playing. This helps me determine if the music fits the mood and theme of the game.
I was able to find a fun 8-bit background track that I thought worked very well for the game at opengameart.org, so we’ll be using it for our game.
The first thing we need to do is add all the music to the asset loader so that we can use them in the game.
// assetLoader

// sounds dictionary

  this.sounds      = {

    'bg'            : 'sounds/bg.mp3',

    'jump'          : 'sounds/jump.mp3',

    'gameOver'      : 'sounds/gameOver.mp3'

  };
  var assetsLoaded = 0;                                // how many assets have been loaded

  var numImgs      = Object.keys(this.imgs).length;    // total number of image assets

  var numSounds    = Object.keys(this.sounds).length;  // total number of sound assets

  this.totalAssest = numImgs;                          // total number of assets
  /**

   * Check the ready state of an Audio file.

   * @param {object} sound - Name of the audio asset that was loaded.

   */

  function _checkAudioState(sound) {

    if (this.sounds[sound].status === 'loading' && this.sounds[sound].readyState === 4) {

      assetLoaded.call(this, 'sounds', sound);

    }

  }
  /**

   * Create assets, set callback for asset loading, set asset source

   */

  this.downloadAll = function() {

    // load images

    // …
    // load sounds

    for (var sound in this.sounds) {

      if (this.sounds.hasOwnProperty(sound)) {

        src = this.sounds[sound];
        // create a closure for event binding

        (function(_this, sound) {

          _this.sounds[sound] = new Audio();

          _this.sounds[sound].status = 'loading';

          _this.sounds[sound].name = sound;

          _this.sounds[sound].addEventListener('canplay', function() {

            _checkAudioState.call(_this, sound);

          });

          _this.sounds[sound].src = src;

          _this.sounds[sound].preload = 'auto';

          _this.sounds[sound].load();

        })(_this, sound);

      }

    }

  }
  return {

    imgs: this.imgs,

    sounds: this.sounds,

    totalAssest: this.totalAssest,

    downloadAll: this.downloadAll

  };
When we call downloadAll(), the asset loader will now load all the images as well as all the audio files. Loading Audio is very similar to loading images, with one major difference: knowing when the audio has loaded.
In my previous attempt of loading music, I had to resort to a setInterval check of each Audio source to see if it had loaded. I later discovered a way to do this with an event call similar to onload for images. By listening to the canplay event of an Audio object, I could check the readyState to make sure it was really loaded.
Since the canplay event can fire multiple times for a single Audio object, it’s important to check that the audio hasn’t already been loaded by checking it’s status property. If you just check the readState of the Audio, it could be loaded twice and you could run into problems later if the Audio you thought was ready was, in fact, still loading.
Next, we’ll play the sounds at the appropriate time during the game. The background music when the player starts the game, the game over music when the player dies, and the jumping sound when the player jumps.
/**

 * Start the game - reset all variables and entities, spawn ground and water.

 */

function startGame() {

   // …
  assetLoader.sounds.gameOver.pause();

  assetLoader.sounds.bg.currentTime = 0;

  assetLoader.sounds.bg.loop = true;

  assetLoader.sounds.bg.play();

}
/**

 * End the game and restart

 */

function gameOver() {

  // …

  assetLoader.sounds.bg.pause();

  assetLoader.sounds.gameOver.currentTime = 0;

  assetLoader.sounds.gameOver.play();

}
// player

  /**

   * Update the player's position and animation

   */

  player.update = function() {
    // jump if not currently jumping or falling

    if (KEY_STATUS.space && player.dy === 0 && !player.isJumping) {

      player.isJumping = true;

      player.dy = player.jumpDy;

      jumpCounter = 12;

      assetLoader.sounds.jump.play();

    }

    // …

  }
The last thing we want to do is add a way to mute all game sounds. If there was one thing I learned from my last game, it was that auto-playing music with no way to turn it off is the worst! So this time around, we’ll fix that problem.
Another nice feature that we’ll add is the ability for the game to know if the user had the music on or off the last time they played. To do this, we’ll use local storage to store a boolean representing if the music is on or off.
We’ll add an icon in the top-left corner of the game that shows the state of the music, and we’ll allow the player to click on this icon to toggle the music. We’ll add the html right before the menu div.
  <!-- div class="wrapper" -->

  <div class="sound sound-off"></div>

    <!-- div id="menu" -->
.sound {

  display: none;

  position: absolute;

  top: 10px;

  left: 10px;

  width: 30px;

  height: 25px;

  cursor: pointer;

  z-index: 3;

}

.sound-on {

  background-image: url('imgs/soundOn.png');

  background-repeat: no-repeat;

}

.sound-off {

  background-image: url('imgs/soundOff.png');

  background-repeat: no-repeat;

}
var canUseLocalStorage = 'localStorage' in window && window.localStorage !== null;

var playSound;
// set the sound preference

if (canUseLocalStorage) {

  playSound = (localStorage.getItem('kandi.playSound') === "true")
  if (playSound) {

    $('.sound').addClass('sound-on').removeClass('sound-off');

  }

  else {

    $('.sound').addClass('sound-off').removeClass('sound-on');

  }

}
/**

 * Show the main menu after loading all assets

 */

function mainMenu() {

  for (var sound in assetLoader.sounds) {

    if (assetLoader.sounds.hasOwnProperty(sound)) {

      assetLoader.sounds[sound].muted = !playSound;

    }

  }
  $('#progress').hide();

  $('#main').show();

  $('#menu').addClass('main');

  $('.sound').show();

}
/**

 * Click handlers for the different menu screens

 */

// …

$('.sound').click(function() {

  var $this = $(this);

  // sound off

  if ($this.hasClass('sound-on')) {

    $this.removeClass('sound-on').addClass('sound-off');

    playSound = false;

  }

  // sound on

  else {

    $this.removeClass('sound-off').addClass('sound-on');

    playSound = true;

  }
  if (canUseLocalStorage) {

    localStorage.setItem('kandi.playSound', playSound);

  }
  // mute or unmute all sounds

  for (var sound in assetLoader.sounds) {

    if (assetLoader.sounds.hasOwnProperty(sound)) {

      assetLoader.sounds[sound].muted = !playSound;

    }

  }

});
The first thing we do in the JavaScript is determine if the player’s browser supports local storage. If it does, we go ahead and read the property kandi.playSound to determine if the music is turned on (true) or turned off (false). We use the variable playSound to save this setting.
Since local storage is a list of key-value pairs, you might need to namespace any key names you add to local storage so you don’t override any keys from other games. You only have to do this if you plan to set up all your games on the same subdomain, like I do, since the browser already namespaces each origin automatically.
Another important thing to note about local storage is that it stores all values as strings. This means that if you store a boolean in local storage, it comes back out as a string. This is why when we looked at the kandi.playSound value, we compared it against the string "true" and not the boolean value true.
Once all assets have loaded, we’ll set the muted property of all Audio objects to match the user’s preference. Since we’re using playSound === true to mean that the user wants sound, we need to set the muted property to the opposite of that.
The last thing we do is add a click handler to the icon which toggles the sound-on and sound-off classes (to show the different icon states), sets the local storage variable to match the icon state, and then mutes or unmutes all the game sounds based on the new preference.
With the audio added to the game, our game is finished and ready to play.
Conclusion
In this tutorial we learned about the differences between creating game UI in either DOM elements or the canvas, as well as the pros and cons to both approaches. We also created the menus for our game and added audio as a final touch.
I hope you’ve enjoyed this 3 part tutorial series on creating an endless runner style game in the HTML5 canvas. We’ve discussed JavaScript techniques such as the module pattern for creating singletons and prototypal inheritance to create reusable objects that all our games objects can use.
I would love to see the games that are made from these tutorials. If you want to put a link in the comments to a game made using a technique found in these tutorials, please do so that I can look at them. If you have any suggestions or comments please leave them as well.