HTML5 Canvas Game: HTML5 Audio and Finishing Touches
In the fifth and final tutorial of the Galaxian Style HTML5 game series, we’ll be finishing up the game by adding details such as player score, a game over screen, infinite enemy waves, and HTML5 audio. We’ll also discuss things you can do on your own to improve the game.
Difficulty: Medium
Languages: HTML5, JavaScript
Code: https://github.com/straker/galaxian-canvas-game/tree/master/part5
Part 5
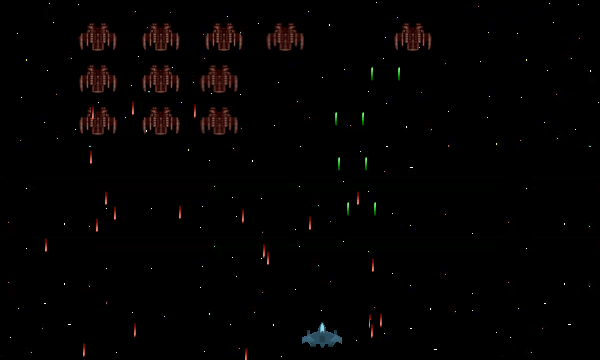
We’ll begin by seeing the final result of this tutorial. Make sure you click inside the game if the controls aren’t working.
Controls: Move – Arrow keys (←↑↓→)
Shoot – Spacebar
The game now has sound (in the background, when you fire a laser, when you hit an enemy, and when you die) and keeps track of your score. It will also let you restart the game if you get hit and spawn another wave of enemies when you kill the last one on the screen.
The HTML5 Page
We’ll start out this tutorial by adding the player score and the game over screen. Both are done by modifying the HTML page.
<!DOCTYPE html>

<html>

	<head>

		<title>Space Shooter Demo</title>

		<style>

			canvas {

				position: absolute;

				top: 0px;

				left: 0px;

				background: transparent;

			}

			#background {

				z-index: -2;

			}

			#main {

				z-index: -1;

			}

			#ship {

				z-index: 0;

			}

			.score {

				position: absolute;

				top: 5px;

				left: 480px;

				color: #FF7F00;

				font-family: Helvetica, sans-serif;

				cursor: default;

			}

			.game-over {

				position: absolute;

				top: 100px;

				left: 210px;

				color: #FF7F00;

				font-family: Helvetica, sans-serif;

				font-size: 30px;

				cursor: default;

				display: none;

			}

			.game-over span {

				font-size: 20px;

				cursor: pointer;

				position: relative;

				left: 50px;

			}

			.game-over span:hover {

				color: #FFD700;

			}

		</style>

	</head>

	<body>

		<!-- The canvas for the panning background -->

		<canvas id="background" width="600" height="360">

			Your browser does not support canvas. Please try again with a different browser.

		</canvas>

		<!-- The canvas for all enemy ships and bullets -->

		<canvas id="main" width="600" height="360">

		</canvas>

		<!-- The canvas the ship uses (can only move up

         one forth the screen. -->

		<canvas id="ship" width="600" height="360">

		</canvas>

		<div class="score">SCORE: <span id="score"></span></div>

		<div class="game-over" id="game-over">GAME OVER<p><span onclick="game.restart()">Restart</span></p></div>

		<script src="space_shooter_part_five.js"></script>

	</body>

</html>
We add two new divs underneath the canvas, one for displaying the players score and the other for displaying the game over screen. We also add new styles to position these elements in their correct locations on the screen and make them look nice.
The Player Score
To implement the player score, we add a variable in the Game object and modify the draw() function of the Enemy object to add points to the score whenever the ship is colliding.
function Game() {

   this.init = function() {

      …

      this.playerScore = 0;

      …

   }

}
function Enemy() {

   …

   this.draw = function() {

		…
		if (!this.isColliding) {

			this.context.drawImage(imageRepository.enemy, this.x, this.y);
			// Enemy has a chance to shoot every movement

			chance = Math.floor(Math.random()*101);

			if (chance/100 < percentFire) {

				this.fire();

			}
			return false;

		}

		else {

			game.playerScore += 10;

			return true;

		}

	};
We then display the score in the animate() function.
function animate() {

   document.getElementById('score').innerHTML = game.playerScore;

   …
HTML5 Game Audio – The Basics
We’ll next implement audio in our game. To do this, we’ll be using the HTML5 Audio API to add game sounds. The HTML5 Audio API is still a bit funky when it comes to how it implements things. Because of this, we’ll be doing some ‘hackish’ style coding to make everything work properly.
There are two things you should be aware of when using the HTML5 Audio API for game sound.
The first thing you should know is that there is no good way to tell if an sound is fully loaded and ready to play. The API has a good list of events it can detect, but not even canplaythrough works properly. Instead, we’ll be using a timed interval to check the readyState of the Audio to ensure that it is ready to play. If the readyState of the Audio is 0 and you try to set the audio’s currentTime, you will get a DOM exception. So we need to ensure that the readyState is 4 before we do anything.
The second thing to be aware of is using the HTML5 Audio API for sound effects. If you want to have overlapping sounds (such as the laser sound for firing), each sound must be its own Audio element. This is because each sound has to play independently from all the others. There are a few ways to accomplish sound effects, but all of them have the same drawback: every new Audio element has to download the audio source! At the time of writing this article, I have yet to find a good way to have one audio source play multiple instances without downloading the audio source again.
Since using Audio.cloneNode(true) would result in downloading the audio, we will use the same technique we used for solving creating and deleting objects: an object pool (in this case a sound pool). We will load multiple sound objects into an array and then reuse them, ensuring we don’t download the source audio every time and instead download it a few times at the start of the game. This method may not be the best way to go about handling this problem, but we already have the code to reuse and it saves HTTP requests in the long run. If you know of a better way to handle this, please let me know in the comments.
Adding HTML5 Audio
To add HTML5 audio to the game, we’ll start by creating the sound pool. It’s very similar to our object pool, but needs to be slightly modified for handling sound.
/**

 * A sound pool to use for the sound effects

 */

function SoundPool(maxSize) {

	var size = maxSize; // Max sounds allowed in the pool

	var pool = [];

	this.pool = pool;

	var currSound = 0;
	/*

	 * Populates the pool array with the given sound

	 */

	this.init = function(object) {

		if (object == "laser") {

			for (var i = 0; i < size; i++) {

				// Initalize the sound

				laser = new Audio("sounds/laser.wav");

				laser.volume = .12;

				laser.load();

				pool[i] = laser;

			}

		}

		else if (object == "explosion") {

			for (var i = 0; i < size; i++) {

				var explosion = new Audio("sounds/explosion.wav");

				explosion.volume = .1;

				explosion.load();

				pool[i] = explosion;

			}

		}

	};
	/*

	 * Plays a sound

	 */

	this.get = function() {

		if(pool[currSound].currentTime == 0 || pool[currSound].ended) {

			pool[currSound].play();

		}

		currSound = (currSound + 1) % size;

	};

}
The sound pool is different from the object pool that we used for game objects in that it doesn’t need to push and pop the sounds from the array. An audio element will play until the end of the track, then set its ended state to true. Therefore we can just loop over the array of sounds, playing it only if it’s currentTime = 0 or if it has ended. We just need to make sure that we have enough sound objects in the pool that we never run into the problem of not being able to play a sound. Calling the load() function of an Audio element tells the browser to load the audio file (helps with older browsers).
With the sound pool ready, We can now add the game audio to our Game object.
function Game() {

   this.init = function() {

      …

      // Audio files

			this.laser = new SoundPool(10);

			this.laser.init("laser");
			this.explosion = new SoundPool(20);

			this.explosion.init("explosion");
			this.backgroundAudio = new Audio("sounds/kick_shock.wav");

			this.backgroundAudio.loop = true;

			this.backgroundAudio.volume = .25;

			this.backgroundAudio.load();
			this.gameOverAudio = new Audio("sounds/game_over.wav");

			this.gameOverAudio.loop = true;

			this.gameOverAudio.volume = .25;

			this.gameOverAudio.load();
			this.checkAudio = window.setInterval(function(){checkReadyState()},1000);

		}

   }

}
The init() function now sets up the audio objects that we need for lasers, explosions, and background audios for the game and game over screen. The loop flag tells the Audio element to play over when it has finished (creating an infinite sound loop). Ten laser sounds is sufficient with our current fire rate of the ship. If you increase the fire rate of the ship, be sure to add more lasers to the sound pool. Since the ship can fire two lasers at a time, we will add twice as many explosion sounds than laser sounds to the sound pool.
To ensure that the game sounds have fully loaded to avoid DOM exception errors, we create a timed interval to check the ready state of our biggest audio files: game_over.wav and kick_shock.wav.
/**

 * Ensure the game sound has loaded before starting the game

 */

function checkReadyState() {

	if (game.gameOverAudio.readyState === 4 && game.backgroundAudio.readyState === 4) {

		window.clearInterval(game.checkAudio);

		game.start();

	}

}
By adding this time interval, we can check the readyState of both HTML5 audio elements and only start the game if they are fully loaded. This means we need to remove the game.start() call from the init() function.
function init() {

	game.init();

}
We can now add sound to our game in their proper places: firing a laser and hitting an enemy.
function Ship() {

   …

/*

	 * Fires two bullets

	 */

	this.fire = function() {

		this.bulletPool.getTwo(this.x+6, this.y, 3,

		                       this.x+33, this.y, 3);

		game.laser.get();

	};

}
function Enemy() {

   …

   this.draw = function() {

      …

      if (!this.isColliding) {

			this.context.drawImage(imageRepository.enemy, this.x, this.y);
			// Enemy has a chance to shoot every movement

			chance = Math.floor(Math.random()*101);

			if (chance/100 < percentFire) {

				this.fire();

			}
			return false;

		}

		else {

			game.playerScore += 10;

			game.explosion.get();

			return true;

		}

   }

}
Now every time that we fire or hit an enemy, the game will play the appropriate sound effect. To play the background sound, we add it to the start() function of the Game object.
// Start the animation loop

	this.start = function() {

		this.ship.draw();

		this.backgroundAudio.play();

		animate();

	};
Finishing Touches
To make the game more challenging, we will add infinite waves to the game. To do this, we move the code to initialize the enemy pool object in the Game object into its own function and call it each time we want to spawn a new wave.
function Game() {

this.init = function() {

…

// Initialize the enemy pool object

			this.enemyPool = new Pool(30);

			this.enemyPool.init("enemy");

			this.spawnWave();

…

}
// Spawn a new wave of enemies

	this.spawnWave = function() {

		var height = imageRepository.enemy.height;

		var width = imageRepository.enemy.width;

		var x = 100;

		var y = -height;

		var spacer = y * 1.5;

		for (var i = 1; i <= 18; i++) {

			this.enemyPool.get(x,y,2);

			x += width + 25;

			if (i % 6 == 0) {

				x = 100;

				y += spacer

			}

		}

	}
Then inside the animate loop, we check to see if there are no more enemies and spawn a new wave if there isn’t.
function animate() {

…

// No more enemies

	if (game.enemyPool.getPool().length === 0) {

		game.spawnWave();

	}
The last thing to implement is the game over and restart functionality. When the player dies, we want the text “Game Over” to appear on the screen, the game to stop playing, and the ability for the player to restart the game from the beginning. To do this, we will create two new functions in the Game object: gameOver() and restart().
	// Game over

	this.gameOver = function() {

		this.backgroundAudio.pause();

		this.gameOverAudio.currentTime = 0;

		this.gameOverAudio.play();

		document.getElementById('game-over').style.display = "block";

	};
// Restart the game

	this.restart = function() {

		this.gameOverAudio.pause();
		document.getElementById('game-over').style.display = "none";

		this.bgContext.clearRect(0, 0, this.bgCanvas.width, this.bgCanvas.height);

		this.shipContext.clearRect(0, 0, this.shipCanvas.width, this.shipCanvas.height);

		this.mainContext.clearRect(0, 0, this.mainCanvas.width, this.mainCanvas.height);
		this.quadTree.clear();
		this.background.init(0,0);

		this.ship.init(this.shipStartX, this.shipStartY,

		               imageRepository.spaceship.width, imageRepository.spaceship.height);
		this.enemyPool.init("enemy");

		this.spawnWave();

		this.enemyBulletPool.init("enemyBullet");
		this.playerScore = 0;
		this.backgroundAudio.currentTime = 0;

		this.backgroundAudio.play();
		this.start();

	};
The gameOver() function just stops the background audio from playing and starts the game over audio, as well as displays the game over text we hid. The restart() function just takes all game elements back to their initial state and starts the game over again.
To stop the game from playing in when the player gets hit, we just add a condition in the animate loop to not recall it if the player is no longer alive.
function animate() {

	document.getElementById('score').innerHTML = game.playerScore;
	// Insert objects into quadtree

	game.quadTree.clear();

	game.quadTree.insert(game.ship);

	game.quadTree.insert(game.ship.bulletPool.getPool());

	game.quadTree.insert(game.enemyPool.getPool());

	game.quadTree.insert(game.enemyBulletPool.getPool());
	detectCollision();
	// No more enemies

	if (game.enemyPool.getPool().length === 0) {

		game.spawnWave();

	}
	// Animate game objects

	if (game.ship.alive) {

		requestAnimFrame( animate );
		game.background.draw();

		game.ship.move();

		game.ship.bulletPool.animate();

		game.enemyPool.animate();

		game.enemyBulletPool.animate();

	}

}
We now how a fully functional game that has sound, collision detection, movement, and a game over screen!
Expanding the game
The last thing I want to discuss in this tutorial are ways in which you could expand upon this game. There are many things you could do, and which I encourage you to do, to make the game better and more complete (after all, only 1 spawn is not what we could call a “game”). Below is a list of things you could do to improve the game and expand it.
- Add hitboxes to the player ship and enemy ships – you may have already noticed, but the current implementation allows the player to get hit above the wings because the bounding box test checks the whole image sprite size. To make collision detection better, add a hit box around the player ship and enemy ship that is smaller than the sprite size and more closely represents the size of the objects.
- Add more enemy types – this goes without saying, but adding more enemies to the game will make it more interesting.
- Add bosses and levels – make the game longer and more difficult by adding multiple levels with bosses at the end of each level.
- Add explosion and particle effects – the enemy ships just disappear from the screen when they are hit. Adding an explosion and particle effects when they are hit will make the game that much better.
- Add a parallax scrolling background – this is probably the easiest item to add, but adds so much to the game. By just making two backgrounds scroll at different speeds is an amazing effect for any game. Just look at what I did for my Game Jam game to see what I mean.
- Add more weapons and power-ups – what’s a shump without multiple weapon types and abilities?
- Change movement into vectors – instead of using static position.x and position.y, try implementing vectors in the game to make movement more uniform for all objects. Here are two helpful tutorials for vector math.
- Use libraries – this tutorial was designed to show you how to create a game from scratch without the use of libraries. But why reinvent the wheel? Try using libraries for your games to help you develop faster. Here is one I recommend (it even has a library for sound).
Conclusion
I hope you enjoyed this 5 part tutorial series on creating a game in the HTML5 canvas. It’s gone through a lot of information, from problems with the HTML5 canvas, to implementing advanced techniques such as object pools and quadtrees for collision detection, to ensuring game assets are loaded by using an image repository and an HTML5 audio loader.
I would love to see the games that are made from these tutorials. If you want to put a link in the comments to a game made using a technique found in these tutorials, please do so that I can look at them. If you have any suggestions or comments please leave them as well. If all goes well, I plan on making another series of tutorials that will cover the CreateJS suite linked to earlier to create another style of game. Thanks for reading!