HTML5 Game Tutorial: Prototypal Inheritance
In the previous tutorial we learned about the Module Pattern and how to create modules to help organize and simplify our code. In this tutorial, we’ll use prototypal inheritance to create modules that share a common set of code which will add to the organization and simplicity our code.
Code: https://github.com/straker/endless-runner-html5-game/tree/master/part2
Part 2
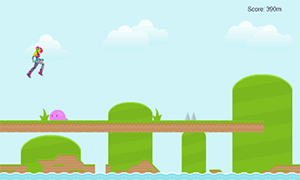
To begin, let’s look at the final product we will be creating for this tutorial. Click inside the game if the controls aren’t working.
Controls: Jump – Spacebar
We now have a nice endless runner complete with baddies, traps, and varying platforms and heights.
The HTML and CSS for our game hasn’t changed, so we’ll move right into talking about how we plan to organize our code using the JavaScript technique of prototypal inheritance.
Prototypal Inheritance
Prototypal Inheritance is how JavaScript implements the object-oriented principle of inheritance. However, since JavaScript doesn’t have classes, it implements inheritance differently than other class-based languages (such as Java and C++). Because of this, prototypal inheritance can be confusing for new JavaScript developers.
We’ve discussed how JavaScript’s prototypal inheritance works before, so I’ll just do a quick recap here.
Every object in JavaScript has a reference to a parent object called the object’s prototype. This reference is used to find properties that may exist in the object’s prototype that do not exist in the current object. In this manner, JavaScript is able to link objects together so that they can share a common set of properties.
This is best explained by an example. Using the classic inheritance example, suppose you wanted to create a set of shared properties that both a dog and a cat object can use. These properties will tell the dog and cat how to walk and speak.
function Animal() {};
Animal.prototype.walk = function() {

  console.log("Animal: Walking");

};
Animal.prototype.speak = function() {

  console.log("Animal: Speaking");

};
animal = new Animal();

animal.speak();  // 'Animal: Speaking'
You may be wondering why I added the walk() and speak() functions to the Animal‘s prototype. There are several reasons why this is done, but the main advantage is that any object which now inherits from Animal will not get it’s own instance of walk() and speak(), but instead will only reference the functions. In the end this is faster and more memory performant.
Now let’s define a dog and a cat that will reference the Animal function so that they too can walk and speak. In JavaScript, we do this by setting the prototype property of a function to equal Animal‘s prototype using Object.create.
function Dog() {}

function Cat() {}
Dog.prototype = Object.create(Animal.prototype);

Cat.prototype = Object.create(Animal.prototype);
dog = new Dog();

cat = new Cat();
dog.speak();  // 'Animal: Speaking'

cat.speak();  // 'Animal: Speaking'
As you can see, even though both the Dog and the Cat functions are empty, they still can use the speak() function from Animal. This is because JavaScript saw that both the dog and the cat objects did not have a function called speak, so it looked at their prototype object Animal and found the function and used it.
Since JavaScript will only look at an object’s prototype if the property doesn’t exist in the object, we can define the same properties in the Dog and Cat functions and use those instead of the Animal property.
function Dog() {

  this.speak = function() {

    console.log("Dog: Bark!");

  }

}

Dog.prototype = Object.create(Animal.prototype);
dog = new Dog();
dog.speak();  // 'Dog: Bark!'

dog.walk();   // 'Animal: Walking';
By using prototypal inheritance, we can create a base object that all of our game objects will use. This will allow us to write the code once and use it everywhere.
The JavaScript
With an understanding of how prototypal inheritance works, we can begin discussing how we will use it in our game. Each object in our game (the player, platforms, baddies, and plants) share a common set of functionality: they all need to know their current position and also how to update their position every frame.
To implement this functionality, we will create a basic Vector object which will hold the needed information. Every object in the game will then inherit from Vector so that we don’t have to implement the functionality in the objects themselves.
/**
* A vector for 2d space.
* @param {integer} x - Center x coordinate.
* @param {integer} y - Center y coordinate.
* @param {integer} dx - Change in x.
* @param {integer} dy - Change in y.
*/
function Vector(x, y, dx, dy) {
// position
this.x = x || 0;
this.y = y || 0;
// direction
this.dx = dx || 0;
this.dy = dy || 0;
}
/**
* Advance the vectors position by dx,dy
*/
Vector.prototype.advance = function() {
this.x += this.dx;
this.y += this.dy;
};
/**
* Get the minimum distance between two vectors
* @param {Vector}
* @return minDist
*/
Vector.prototype.minDist = function(vec) {
var minDist = Infinity;
var max = Math.max( Math.abs(this.dx), Math.abs(this.dy),
Math.abs(vec.dx ), Math.abs(vec.dy ) );
var slice = 1 / max;
var x, y, distSquared;
// get the middle of each vector
var vec1 = {}, vec2 = {};
vec1.x = this.x + this.width/2;
vec1.y = this.y + this.height/2;
vec2.x = vec.x + vec.width/2;
vec2.y = vec.y + vec.height/2;
for (var percent = 0; percent < 1; percent += slice) {
x = (vec1.x + this.dx * percent) - (vec2.x + vec.dx * percent);
y = (vec1.y + this.dy * percent) - (vec2.y + vec.dy * percent);
distSquared = x * x + y * y;
minDist = Math.min(minDist, distSquared);
}
return Math.sqrt(minDist);
};
[/javascript]
We'll be using the minDist() function to determine if the player collides with a platform or an enemy. Since a player and the platform or enemy are moving in opposite directions, it is entirely possible that in one frame they are too far apart to collide but are on a collision path and in the very next frame have updated past one another and are again too far apart to collide.
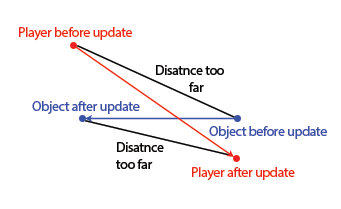
Because of this, we cannot just use a regular distance formula between two points since this will allow the player and the object to pass through one another or more often just not collide at the right point. Instead, we need to determine if at any time during a player's movement from point a to point b his path crosses that of the platform or enemy.
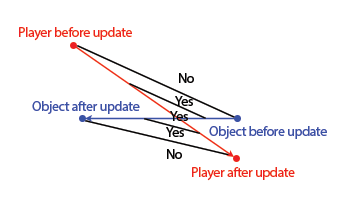
To do this, we first determine the largest value of dx and dy between the two objects. The larger the number, the more times we need to look at different parts of the path to ensure we don't miss anything.
Since this equations only works if the distances are measured from center to center, we need to determine what the center of each object is since JavaScript uses the top-left of the image as it's origin. Once we have both center points, we can then take different surveys of the vectors' paths and get the distance between them. We only need to return the smallest distance between the two vectors since this number determines if a vector collided with another.
With the Vector object we can now create all of our game objects that will inherit from it.
The AssetLoader Module
Before we get into the other game objects, we'll need to update the asset loader. With the addition of new platforms, plants, and enemies we'll need to update the list of images the asset loader loads.
[javascript]
(function () {
// define variables
var canvas = document.getElementById('canvas');
var ctx = canvas.getContext('2d');
var player, score, stop, ticker;
var ground = [], water = [], enemies = [], environment = [];
// platform variables
var platformHeight, platformLength, gapLength;
var platformWidth = 32;
var platformBase = canvas.height - platformWidth; // bottom row of the game
var platformSpacer = 64;
/**
* Asset pre-loader object. Loads all images
*/
var assetLoader = (function() {
// images dictionary
this.imgs = {
"bg" : "imgs/bg.png",
"sky" : "imgs/sky.png",
"backdrop" : "imgs/backdrop.png",
"backdrop2" : "imgs/backdrop_ground.png",
"grass" : "imgs/grass.png",
"avatar_normal" : "imgs/normal_walk.png",
"water" : "imgs/water.png",
"grass1" : "imgs/grassMid1.png",
"grass2" : "imgs/grassMid2.png",
"bridge" : "imgs/bridge.png",
"plant" : "imgs/plant.png",
"bush1" : "imgs/bush1.png",
"bush2" : "imgs/bush2.png",
"cliff" : "imgs/grassCliffRight.png",
"spikes" : "imgs/spikes.png",
"box" : "imgs/boxCoin.png",
"slime" : "imgs/slime.png"
};
// …
};
The Player Module
In the previous tutorial the player was just a stand alone object. Let’s turn that object into a proper singleton while letting it inherit from Vector. To do this, we will use modular import to pass the Vector prototype object into the IIFE and then add our player properties directly to the imported object.
/**
* The player object
*/
var player = (function(player) {
// add properties directly to the player imported object
player.width = 60;
player.height = 96;
player.speed = 6;
// jumping
player.gravity = 1;
player.dy = 0;
player.jumpDy = -10;
player.isFalling = false;
player.isJumping = false;
// spritesheets
player.sheet = new SpriteSheet("imgs/normal_walk.png", player.width, player.height);
player.walkAnim = new Animation(player.sheet, 4, 0, 15);
player.jumpAnim = new Animation(player.sheet, 4, 15, 15);
player.fallAnim = new Animation(player.sheet, 4, 11, 11);
player.anim = player.walkAnim;
Vector.call(player, 0, 0, 0, player.dy);
var jumpCounter = 0; // how long the jump button can be pressed down
/**
* Update the player's position and animation
*/
player.update = function() {
// jump if not currently jumping or falling
if (KEY_STATUS.space && player.dy === 0 && !player.isJumping) {
player.isJumping = true;
player.dy = player.jumpDy;
jumpCounter = 12;
}
// jump higher if the space bar is continually pressed
if (KEY_STATUS.space && jumpCounter) {
player.dy = player.jumpDy;
}
jumpCounter = Math.max(jumpCounter-1, 0);
this.advance();
// add gravity
if (player.isFalling || player.isJumping) {
player.dy += player.gravity;
}
// change animation if falling
if (player.dy > 0) {
player.anim = player.fallAnim;
}
// change animation is jumping
else if (player.dy < 0) {
player.anim = player.jumpAnim;
}
else {
player.anim = player.walkAnim;
}
player.anim.update();
};
/**
* Draw the player at it's current position
*/
player.draw = function() {
player.anim.draw(player.x, player.y);
};
/**
* Reset the player's position
*/
player.reset = function() {
player.x = 64;
player.y = 250;
};
return player;
})(Object.create(Vector.prototype));
/**
* Keep track of the spacebar events
*/
var KEY_CODES = {
32: "space"
};
var KEY_STATUS = {};
for (var code in KEY_CODES) {
if (KEY_CODES.hasOwnProperty(code)) {
KEY_STATUS[KEY_CODES[code]] = false;
}
}
document.onkeydown = function(e) {
var keyCode = (e.keyCode) ? e.keyCode : e.charCode;
if (KEY_CODES[keyCode]) {
e.preventDefault();
KEY_STATUS[KEY_CODES[keyCode]] = true;
}
};
document.onkeyup = function(e) {
var keyCode = (e.keyCode) ? e.keyCode : e.charCode;
if (KEY_CODES[keyCode]) {
e.preventDefault();
KEY_STATUS[KEY_CODES[keyCode]] = false;
}
};
[/javascript]
The player object starts by defining the variables that we'll use to make our player run and jump. To make jumping better, we'll allow the player to control the height of their jump so they can better avoid obstacles. To do this, we'll use a technique called ascent control to allow the player to hold the jump button (spacebar) and set the player's dy to equal jumpDy every frame spacebar is held.
Since we don't want the player to jump indefinitely, we'll need to limit how long the player can hold down the spacebar and still jump. jumpCounter will be used to determine how many frames the player can jump for before falling back down. We also don't want to allow the player to jump multiple times in the air, so we'll use isJumping to know when the player is currently jumping and isFalling to know when the player is falling and shouldn't be able to jump.
We also create three different animations from our spritesheet for each of the actions of walking, jumping, and falling, and then set anim to be the currently playing animation.
The last thing we do before defining the player functions is use call to call the Vector object. By doing this, we let the Vector object set our x, y, dx and dy variables for us. In essence this is like calling the constructor of our parent object.
In our update() function we:
- determine if the player is able to jump
- if the player is able to jump then set the jump dy
- update
jumpCounter (ensuring it never is less than 0)
- call the
Vector's advance() function to update the player's position
- add gravity if the player is falling or jumping
- change to the appropriate animation
- and lastly update the animation
The draw() function just draws the animation to the screen at the player's position and reset() resets our player's position for when the game starts or restarts.
We also define the KEY_CODES object that just keeps track of when a key is pressed and when the key is released by creating events for key down and key up.
The Sprite Object
Next, we'll define the object that all of our non-player objects belong to: the Sprite object. Since each platform, water tile, enemy, and plant are all virtually the same expect the image that is drawn, we only need one object to define them. This object just needs know where the object is on the screen and how to update it and draw it.
[javascript title="kandi.js"]
/**
* Sprites are anything drawn to the screen (ground, enemies, etc.)
* @param {integer} x - Starting x position of the player
* @param {integer} y - Starting y position of the player
* @param {string} type - Type of sprite
*/
function Sprite(x, y, type) {
this.x = x;
this.y = y;
this.width = platformWidth;
this.height = platformWidth;
this.type = type;
Vector.call(this, x, y, 0, 0);
/**
* Update the Sprite's position by the player's speed
*/
this.update = function() {
this.dx = -player.speed;
this.advance();
};
/**
* Draw the sprite at it's current position
*/
this.draw = function() {
ctx.drawImage(assetLoader.imgs[this.type], this.x, this.y);
};
}
Sprite.prototype = Object.create(Vector.prototype);
As you can see, it’s a very simple object. The only trick to the Sprite object is that you must pass it a type that matches one of the image names from the asset loader. This makes it very easy to draw the image since we can grab the image directly from the asset loader by name.
Another important thing to note is that the speed of all of the objects will always be the player’s speed but in the opposite direction. This allows us to increment the player’s speed throughout the game, increasing the difficulty for the player, and still have all of the objects on the screen reflect that change without additional work.
Platforms
To help our game be more challenging, we’ll add platforms of different lengths and heights, as well gaps between platform groups. Using a technique from Building a Canabalt-Style Infinite Runner, we’ll randomly determine how many gaps to create using gapLength and how many platforms to create using platformLength. We’ll also create a function that will spawn the gaps and platforms that can be used in the animate() function.
/**

 * Get a random number between range

 * @param {integer}

 * @param {integer}

 */

function rand(low, high) {

  return Math.floor( Math.random() * (high - low + 1) + low );

}
/**

 * Bound a number between range

 * @param {integer} num - Number to bound

 * @param {integer}

 * @param {integer}

 */

function bound(num, low, high) {

  return Math.max( Math.min(num, high), low);

}
/**

 * Spawn new sprites off screen

 */

function spawnSprites() {

  // increase score

  score++;
  // first create a gap

  if (gapLength > 0) {

    gapLength -= 1;

  }

  // then create ground

  else if (platformLength > 0) {

    var type = getType();
    ground.push(new Sprite(

      canvas.width + platformWidth % player.speed,

      platformBase - platformHeight * platformSpacer,

      type

    ));

    platformLength -= 1;
    // add random environment sprites

    spawnEnvironmentSprites();
    // add random enemies

    spawnEnemySprites();

  }

  // start over

  else {

    // increase gap length every speed increase of 4

    gapLength = rand(player.speed - 2, player.speed);

    // only allow a ground to increase by 1

    platformHeight = bound(rand(0, platformHeight + rand(0, 2)), 0, 4);

    platformLength = rand(Math.floor(player.speed/2), player.speed * 4);

  }

}
The function first increments the player score which tracks how many platforms the player has crossed. This score will translate into how far the player has run. Next, the function creates any gaps by not creating new sprites if gapLength is greater than 0. If there are no gaps left, it will then create a new platform based on the height of the current platform. The function will also randomly spawn plants and enemies on the platforms.
Since we don’t want these new sprites to just spawn on the screen, we’ll spawn them just behind the player’s view. This means putting them slightly off the canvas to start so that they will then move into the canvas. By taking the mod of the a platform’s width by the player’s speed, we eliminate the gap between platforms that would be created by spawning a sprite at the same moment that we increase the player’s speed.
If there are no gaps or platforms left to create, the function will randomly generate a new gap length based on the player’s speed (higher speeds mean longer gaps), determine the height of the next platform ensuring that it never goes 2 heights above the current height (otherwise the player couldn’t make the jump), and determines the length of the next platform.
A Note About Numbers
It’s important to note that the numbers used to determine gapLength, platformHeight, platformLength and other variables to come were not calculated by an equation. Instead, the numbers were tweaked every time I play tested the game after I changed the code. Each time I played I would try to judge how the game felt and make small adjustments to the random numbers to ensure that each gap was jumpable, each enemy spawn was passable, and that the player wouldn’t be presented with an obstacle that would be impossible to pass.
Play testing in this manner is really the only way to ensure that your game is fun to play and doesn’t become frustrating. There’s just no other good way to go about it. That being said, feel free to tweak these numbers in whatever way you feel makes the game more enjoyable or would make it more difficult to play. Try to see how making a small change to the equation changes how the game plays. Experiment and have fun.
Platforms Continued
To determine the position of each platform as well as the type of image to use for the platform, we’ll use platformHeight to make the decisions for us. Since we have five different platform heights, platformHeight will be a number between 0 and 4.
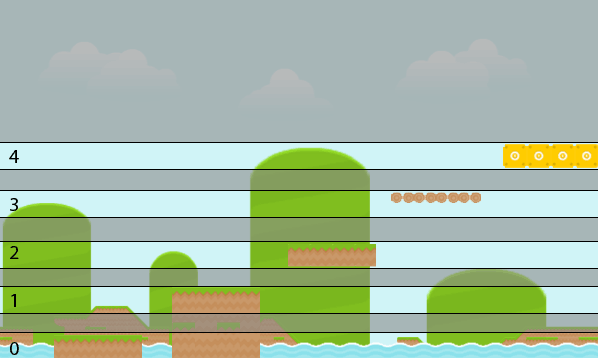
To determine which platform to use, we’ll create a helper function that will return the name of the image to use for the platform based on the value of platformHeight.
/**

 * Get the type of a platform based on platform height

 * @return Type of platform

 */

function getType() {

  var type;

  switch (platformHeight) {

    case 0:

    case 1:

      type = Math.random() > 0.5 ? "grass1" : "grass2";

      break;

    case 2:

      type = "grass";

      break;

    case 3:

      type = "bridge";

      break;

    case 4:

      type = "box";

      break;

  }

  if (platformLength === 1 && platformHeight < 3 && rand(0, 3) === 0) {
    type = "cliff";
  }

  return type;
}
[/javascript]

A "cliff" is always the last platform of a platform group and can only be used for grass types (0-2). Although not necessary to include, I thought it would be fun to add a variation to the end of a platform group just for fun.


Spawning Sprites
Now that we are able to create platforms, we need to create the other types of sprites in our game. We'll first start with spawning plants and bushes.
[javascript title="kandi.js"]

/**

 * Spawn new environment sprites off screen

 */

function spawnEnvironmentSprites() {

  if (score > 40 && rand(0, 20) === 0 && platformHeight < 3) {
    if (Math.random() > 0.5) {

      environment.push(new Sprite(

        canvas.width + platformWidth % player.speed,

        platformBase - platformHeight * platformSpacer - platformWidth,

        'plant'

      ));

    }

    else if (platformLength > 2) {

      environment.push(new Sprite(

        canvas.width + platformWidth % player.speed,

        platformBase - platformHeight * platformSpacer - platformWidth,

        'bush1'

      ));

      environment.push(new Sprite(

        canvas.width + platformWidth % player.speed + platformWidth,

        platformBase - platformHeight * platformSpacer - platformWidth,

        'bush2'

      ));

    }

  }

}
The function first determines that plants and bushes cannot show up before the player has accumulated 40 points. After that, plants have a 5% chance to spawn and will only show up on grass type platforms. The last requirement ensures that plants and bushes don’t spawn on bridges and bricks, which would just look silly.
Plants and bushes can each spawn about the same, but bushes can only spawn on the 3rd level platform (just because that’s how I wanted it). Bushes are a two image piece, so it requires that two sprites are spawned for it.
Next we’ll spawn enemies in our game.
/**

 * Spawn new enemy sprites off screen

 */

function spawnEnemySprites() {

  if (score > 100 && Math.random() > 0.96 && enemies.length < 3 && platformLength > 5 &&

      (enemies.length ? canvas.width - enemies[enemies.length-1].x >= platformWidth * 3 ||

       canvas.width - enemies[enemies.length-1].x < platformWidth : true)) {
    enemies.push(new Sprite(
      canvas.width + platformWidth % player.speed,
      platformBase - platformHeight * platformSpacer - platformWidth,
      Math.random() > 0.5 ? 'spikes' : 'slime'

    ));

  }

}
The enemies have a very interesting requirement to spawn. First, we don’t spawn an enemy unless the player has accumulated 100 points. This way they don’t encounter them too early in the game and get a feel for how to jump before they have to really put their skill to the test.
Next, we only want enemies to spawn 4% of the time. This is because while play testing, I felt that 5% created too many enemies whereas 4% created a good amount. Next, we will only allow 3 enemies to be on the screen at a time so that they player is not just bombarded by enemies and can’t possibly avoid them all.
We will also only spawn an enemy on platform groups longer than 5 platforms. This ensures that the player can jump over the enemy and still land on a platform if timed correctly. The last requirement looks at the placement of other enemies on the screen and prevents another enemy from spawning within 3 platforms of it. This ensures that a player has some amount of gap between enemies so there is a safe spot to land.
Once an enemy is allowed to spawn, there is a 50/50 chance for spawning either a “spike” or a “slime.”
Updating Sprites
Now that we can create all the sprites to our game, let’s figure out how we are going to animate them all.
You may have noticed that we didn’t create a function for spawning the “water” sprites. This is because we never spawn water sprites during the game. Instead, since water plays no part in the game except as decoration, we’ll just reuse any sprites that go off screen as new water sprites coming on screen. In this way the water sprites act like an object pool helping to save memory.
/**

 * Update all water position and draw.

 */

function updateWater() {

  // animate water

  for (var i = 0; i < water.length; i++) {
    water[i].update();
    water[i].draw();
  }

  // remove water that has gone off screen
  if (water[0] && water[0].x < -platformWidth) {
    var w = water.splice(0, 1)[0];
    w.x = water[water.length-1].x + platformWidth;
    water.push(w);
  }
}
[/javascript]

We'll next update the environments. Since they do get spawned during the game, all we have to do is remove them from the list once they go off screen.

[javascript title="kandi.js"]
/**
 * Update all environment position and draw.
 */
function updateEnvironment() {
  // animate environment
  for (var i = 0; i < environment.length; i++) {
    environment[i].update();
    environment[i].draw();
  }

  // remove environment that have gone off screen
  if (environment[0] && environment[0].x < -platformWidth) {
    environment.splice(0, 1);
  }
}
[/javascript]

Updating the player is next and the only thing we need to check for is if the player goes outside the bounds of the game, in which case we end the current run.

[javascript title="kandi.js"]
/**
 * Update the players position and draw
 */
function updatePlayer() {
  player.update();
  player.draw();

  // game over
  if (player.y + player.height >= canvas.height) {

    gameOver();

  }

}
Updating the enemies is almost exactly the same as updating the environments except that we need to check that the player didn’t collide with one of them using the minDist() function.
/**
* Update all enemies position and draw. Also check for collision against the player.
*/
function updateEnemies() {
// animate enemies
for (var i = 0; i < enemies.length; i++) { enemies[i].update(); enemies[i].draw(); // player ran into enemy if (player.minDist(enemies[i]) <= player.width - platformWidth/2) { gameOver(); } } // remove enemies that have gone off screen if (enemies[0] && enemies[0].x < -platformWidth) { enemies.splice(0, 1); } } [/javascript] The last sprite that needs to be updated are the platforms. Updating the platforms is a little tricker in that not only do we have to check if the play collided with a platform, but we also have to check at what angle they collided at. If a player is falling and lands on top of a platform, we want to prevent them from falling through it. However, if a player is falling and collides with the side of the platform, we want the player to keep falling since they missed the platform. Therefore, the angle at which the player collided with the platform is important in determining if the player made the jump or not. [javascript title="kandi.js"] /** * Update all ground position and draw. Also check for collision against the player. */ function updateGround() { // animate ground player.isFalling = true; for (var i = 0; i < ground.length; i++) { ground[i].update(); ground[i].draw(); // stop the player from falling when landing on a platform var angle; if (player.minDist(ground[i]) <= player.height/2 + platformWidth/2 && (angle = Math.atan2(player.y - ground[i].y, player.x - ground[i].x) * 180/Math.PI) > -130 &&
angle < -50) { player.isJumping = false; player.isFalling = false; player.y = ground[i].y - player.height + 5; player.dy = 0; } } // remove ground that have gone off screen if (ground[0] && ground[0].x < -platformWidth) { ground.splice(0, 1); } } [/javascript]
Animating
We’re almost done with the game. Now that we can spawn and update sprites, all that’s left to do is animate them each frame and start the game.
/**
* Game loop
*/
function animate() {
if (!stop) {
requestAnimFrame( animate );
ctx.clearRect(0, 0, canvas.width, canvas.height);
background.draw();
// update entities
updateWater();
updateEnvironment();
updatePlayer();
updateGround();
updateEnemies();
// draw the score
ctx.fillText(‘Score: ‘ + score + ‘m’, canvas.width – 140, 30);
// spawn a new Sprite
if (ticker % Math.floor(platformWidth / player.speed) === 0) {
spawnSprites();
}
// increase player speed only when player is jumping
if (ticker > (Math.floor(platformWidth / player.speed) * player.speed * 20) && player.dy !== 0) {
player.speed = bound(++player.speed, 0, 15);
player.walkAnim.frameSpeed = Math.floor(platformWidth / player.speed) – 1;
// reset ticker
ticker = 0;
// spawn a platform to fill in gap created by increasing player speed
if (gapLength === 0) {
var type = getType();
ground.push(new Sprite(
canvas.width + platformWidth % player.speed,
platformBase – platformHeight * platformSpacer,
type
));
platformLength–;
}
}
ticker++;
}
}
/**
* Start the game – reset all variables and entities, spawn ground and water.
*/
function startGame() {
ground = [];
water = [];
environment = [];
enemies = [];
player.reset();
ticker = 0;
stop = false;
score = 0;
platformHeight = 2;
platformLength = 15;
gapLength = 0;
ctx.font = ’16px arial, sans-serif’;
for (var i = 0; i < 30; i++) {
ground.push(new Sprite(i * (platformWidth-3), platformBase - platformHeight * platformSpacer, 'grass'));
}
for (i = 0; i < canvas.width / 32 + 2; i++) {
water.push(new Sprite(i * platformWidth, platformBase, 'water'));
}
background.reset();
animate();
}
/**
* End the game and restart
*/
function gameOver() {
stop = true;
}
[/javascript]
The animation loop is in charge up updating all the objects and determining when to spawn new sprites. We use the ticker variable to keep track of how many frames have passed and then to determine when a new sprite should be spawned.
The loop also is in charge of increasing the player’s speed while the player is jumping. If you increased the player’s speed while the player was running, the sudden increase in speed throws off the player’s timing and more often than not results in the player falling off an edge.
However, by increasing the speed while the player is in the air, the sudden jump gets hidden in the jump/falling and the player can more easily compensate for the jump.
Also, since increasing the player’s speed would create a small gap between the last spawned platform and the next spawned platform, we’ll just add a platform in that gap to cover it up.
The gameOver() function just sets the variable stop to true which prevents the animation loop from running.
And that’s it! We now have a complete endless runner.
Conclusion
In this tutorial we learned about prototypal inheritance and how JavaScript implements it. We then used that knowledge to create a base object which all of our game objects inherited from. Finally, we created all the game objects and put them together to make a complete endless runner.
In the last tutorial of this series we’ll add audio and menus to our game to make it feel more like a complete game.