HTML5 Canvas Game: The Player Ship
In this second installment of the Galaxian Style HTML5 game series (which has been a long time coming), I’ll be showing you how to create movement on the canvas by using techniques such as dirty rectangles, multiple canvases, and object pools. So sit back, relax, and let’s get to it!
Difficulty: Medium
Languages: HTML5, JavaScript
Code: https://github.com/straker/galaxian-canvas-game/tree/master/part2
Part 2
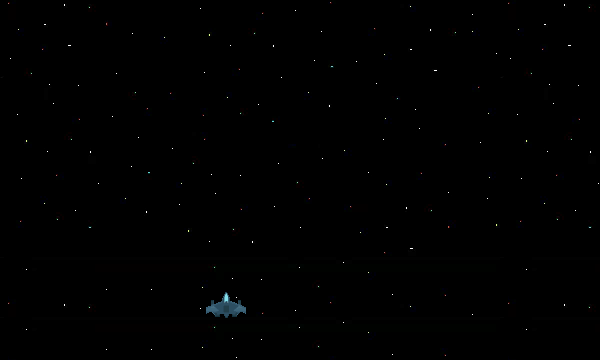
Let’s begin by seeing the final result of this tutorial. Make sure you click inside the game if the controls aren’t working.
Controls: Move – Arrow keys (←↑↓→)
Shoot – Spacebar
Nothing too fancy, but we are getting a ship to move and shoot in the game while maintaining 60FPS.
The HTML Page
Again, we’ll first start out with the webpage.
<!DOCTYPE html>

<html>

	<head>

		<title>Space Shooter Demo</title>

		<style>

			canvas {

				position: absolute;

				top: 0px;

				left: 0px;

				background: transparent;

			}

			#background {

				z-index: -2;

			}

			#main {

				z-index: -1;

			}

			#ship {

				z-index: 0;

			}

		</style>

	</head>

	<body>

		<!-- The canvas for the panning background -->

		<canvas id="background" width="600" height="360">

			Your browser does not support canvas. Please try again with a different browser.

		</canvas>

		<!-- The canvas for all enemy ships and bullets -->

		<canvas id="main" width="600" height="360">

		</canvas>

		<!-- The canvas the ship uses (can only move up

         one forth the screen.) -->

		<canvas id="ship" width="600" height="360">

		</canvas>

		<script src="space_shooter_part_two.js"></script>

	</body>

</html>
A few things have changed, mainly adding two more canvases to the page and styles to stack them in their proper order on the screen. We will be using three canvases for our game because it allows us to not have to redraw the entire game each frame.
One canvas will be for the scrolling background which moves each frame. Another canvas will be used for the player ship because the player ship may or may not be moving each frame. The last canvas will be used for the bullets which move each frame once they are on the screen. The reason we use three canvases in this way will be explained later on.
We also removed the onload="init()" event from the body tag. I’ll explain why we did this in just a bit.
Drawable
The first thing we need to do after the HTML is update the init() function of the Drawable object.
function Drawable() {

	this.init = function(x, y, width, height) {

		// Defualt variables

		this.x = x;

		this.y = y;

		this.width = width;

		this.height = height;

	}

}
Since we are adding images that no longer fill the entire canvas, we need to set the height and width of each object to it’s associated image. This will help us later as we try to draw and then clear each object from the screen.
The imageRepository
With the Drawable object updated, we’ll next update the imageRepository object.
/**

 * Define an object to hold all our images for the game so images

 * are only ever created once. This type of object is known as a

 * singleton.

 */

var imageRepository = new function() {

	// Define images

	this.background = new Image();

	this.spaceship = new Image();

	this.bullet = new Image();
	// Ensure all images have loaded before starting the game

	var numImages = 3;

	var numLoaded = 0;

	function imageLoaded() {

		numLoaded++;

		if (numLoaded === numImages) {

			window.init();

		}

	}

	this.background.onload = function() {

		imageLoaded();

	}

	this.spaceship.onload = function() {

		imageLoaded();

	}

	this.bullet.onload = function() {

		imageLoaded();

	}
	// Set images src

	this.background.src = "imgs/bg.png";

	this.spaceship.src = "imgs/ship.png";

	this.bullet.src = "imgs/bullet.png";

}
We first load the two new images used for the ship and the bullets the ship fires, and then set their src attributes. The main change though is the addition of the imageLoaded() function.
The imageLoaded() function is used to determine when all game assets (in this case images) have successfully loaded. Once all the games assets are loaded, it will start the game. There are two reasons why we added this function.
The first reason is that you can use this function to help produce a loading screen with a loading bar. When each new asset calls this function, you can progress the loading bar by the percent of numLoaded/numImages.
The second (and primary) reason is to fix a bug which was encountered in IE9 and below. When the game would run the game.init() function, the images were not yet fully loaded. This caused the call to imageRepository.ship.width to return 0 since there was no image. This type of bug is known as a race condition. The race was between the image being fully loaded and the call to imageRepository when the image was needed.
By implementing the imageLoaded() function, we are able to ensure that all images are loaded before they are used, negating the race condition from the original code. It is for this reason that the onload="init()" event was taken out of the <body> tag (because the onload event only takes into account assets loaded in the HTML, not through JavaScript) and moved into the imageLoaded() function.
The Player Ship
Next, we’ll write the code to handle a player moving and shooting. To start off, we’ll introduce a new data structure called an object pool.
“An object pool is a data structure which reuses old objects so as not to continually create or delete new ones.” When many objects are created or deleted in quick succession (such as our bullets), it can cause the game to lag as it tries to free up the memory used by those objects. We will be using an object pool to help manage all the bullets the player can shoot so that the game does not become lagged down by having to create and delete every single bullet.
For more information about object pools, check out this article I wrote for Gamedevtuts+
/**

 * Custom Pool object. Holds Bullet objects to be managed to prevent

 * garbage collection.

 */

function Pool(maxSize) {

	var size = maxSize; // Max bullets allowed in the pool

	var pool = [];
	/*

	 * Populates the pool array with Bullet objects

	 */

	this.init = function() {

		for (var i = 0; i < size; i++) {

			// Initalize the bullet object

			var bullet = new Bullet();

			bullet.init(0,0, imageRepository.bullet.width,

			            imageRepository.bullet.height);

			pool[i] = bullet;

		}

	};
	/*

	 * Grabs the last item in the list and initializes it and

	 * pushes it to the front of the array.

	 */

	this.get = function(x, y, speed) {

		if(!pool[size - 1].alive) {

			pool[size - 1].spawn(x, y, speed);

			pool.unshift(pool.pop());

		}

	};
	/*

	 * Used for the ship to be able to get two bullets at once. If

	 * only the get() function is used twice, the ship is able to

	 * fire and only have 1 bullet spawn instead of 2.

	 */

	this.getTwo = function(x1, y1, speed1, x2, y2, speed2) {

		if(!pool[size - 1].alive &&

		   !pool[size - 2].alive) {

				this.get(x1, y1, speed1);

				this.get(x2, y2, speed2);

			 }

	};
	/*

	 * Draws any in use Bullets. If a bullet goes off the screen,

	 * clears it and pushes it to the front of the array.

	 */

	this.animate = function() {

		for (var i = 0; i < size; i++) {

			// Only draw until we find a bullet that is not alive

			if (pool[i].alive) {

				if (pool[i].draw()) {

					pool[i].clear();

					pool.push((pool.splice(i,1))[0]);

				}

			}

			else

				break;

		}

	};

}
When the pool is initialized, it populates an array with empty Bullet objects which will be reused every time a bullet is created. When the pool needs to create a new bullet for use, it looks at the last item in the array and checks to see if it is currently in use. If it is in use, the pool is full and no bullets can be spawned. If it is not in use, the pool spawns the last item in the array and then pops it from the back and pushes it onto the front of the array. This makes the pool have free bullets in the back and used bullets in the front.
When the pool animates the bullets, it checks to see if the bullet is in use (no need to draw unused bullets) and if it is, draws it. If the draw() function returns true, the bullet is ready to be reused and the pool clears the bullet and removes it from the array and pushes it to the back. Doing this makes creating/destroying bullets in the pool have constant time.
With the object pool in hand, we can now create the bullet object.
/**

 * Creates the Bullet object which the ship fires. The bullets are

 * drawn on the "main" canvas.

 */

function Bullet() {

	this.alive = false; // Is true if the bullet is currently in use
	/*

	 * Sets the bullet values

	 */

	this.spawn = function(x, y, speed) {

		this.x = x;

		this.y = y;

		this.speed = speed;

		this.alive = true;

	};
	/*

	 * Uses a "drity rectangle" to erase the bullet and moves it.

	 * Returns true if the bullet moved off the screen, indicating that

	 * the bullet is ready to be cleared by the pool, otherwise draws

	 * the bullet.

	 */

	this.draw = function() {

		this.context.clearRect(this.x, this.y, this.width, this.height);

		this.y -= this.speed;

		if (this.y <= 0 - this.height) {

			return true;

		}

		else {

			this.context.drawImage(imageRepository.bullet, this.x, this.y);

		}

	};
	/*

	 * Resets the bullet values

	 */

	this.clear = function() {

		this.x = 0;

		this.y = 0;

		this.speed = 0;

		this.alive = false;

	};

}

Bullet.prototype = new Drawable();
The Bullet object sets the initial state of the bullet by setting alive to be false. It then defines three methods: spawn, draw, and clear. The spawn method is used to create a new bullet and takes an x and y value as well as the speed of the bullet, setting variables accordingly.
Dirty Rectangles
In the draw method we use a technique known as a dirty rectangle to clear only the immediate area around the bullet. If the bullet goes off the screen, the method returns true signifying it is ready to be reused, otherwise it redraws it.
Dirty rectangles are a great performance boost because clearing the whole canvas is expensive while clearing a small section of the canvas is cheap. Thus, anytime we draw objects to the screen, we will be using dirty rectangles to clear them from the canvas before we redraw them, and we will only redraw those objects that have moved since the last frame.
When working with animation on canvas, performance can be a challenge since bitmap operations are very processing expensive, especially at high resolutions. One important optimization rule to follow is to reuse as many pixels as possible between frames. What I mean by that is the fewer pixels that need to be processed each frame, the faster your program will run. A good example of this is when erasing pixels with the clearRect(x,y,w,h) method, it is very beneficial to clear and redraw only the pixels that have changed and not the full canvas. Unlike the Flash Player’s redraw regions, this management of “dirty rectangles” needs to be done manually for canvas. – Hakim El Hattab
Dirty Rectangles are the reason we split the game up into three canvases. If were only to have one canvas, we would have to paint it in order of bottom to top. The background would be drawn first, then the ship and bullets. Doing it this way would cause us to have to redraw everything each frame, which is expensive.
If we were only to have two canvases, the background would redraw each frame but the ship could be drawn only when it has moved. The bullets would be redrawn each frame using a dirty rectangle, but if the bullet overlaps the ship, part of the ship would be cleared as well. If they player hadn’t moved since the last frame, the ship would not be redraw so the cleared section would remain until the player moved. Not the best effect visually.
So we use three canvases so we can dirty box the bullets without having to clear the ship if the bullet overlaps it. Performance is kept and visually nothing looks askew. This same technique was used in the browser game Contre Jour. Each platform is drawn on it’s own canvas to help speed up performance.
The last method of the bullet object is the clear method. This method just resets all the variables set by the spawn method so that the object can be reused.
The Ship Object
The last object we need to create is the ship object.
/**

 * Create the Ship object that the player controls. The ship is

 * drawn on the "ship" canvas and uses dirty rectangles to move

 * around the screen.

 */

function Ship() {

	this.speed = 3;

	this.bulletPool = new Pool(30);

	this.bulletPool.init();
	var fireRate = 15;

	var counter = 0;
	this.draw = function() {

		this.context.drawImage(imageRepository.spaceship, this.x, this.y);

	};

	this.move = function() {

		counter++;

		// Determine if the action is move action

		if (KEY_STATUS.left || KEY_STATUS.right ||

			KEY_STATUS.down || KEY_STATUS.up) {

			// The ship moved, so erase it's current image so it can

			// be redrawn in it's new location

			this.context.clearRect(this.x, this.y, this.width, this.height);
			// Update x and y according to the direction to move and

			// redraw the ship. Change the else if's to if statements

			// to have diagonal movement.

			if (KEY_STATUS.left) {

				this.x -= this.speed

				if (this.x <= 0) // Keep player within the screen

					this.x = 0;

			} else if (KEY_STATUS.right) {

				this.x += this.speed

				if (this.x >= this.canvasWidth - this.width)

					this.x = this.canvasWidth - this.width;

			} else if (KEY_STATUS.up) {

				this.y -= this.speed

				if (this.y <= this.canvasHeight/4*3)

					this.y = this.canvasHeight/4*3;

			} else if (KEY_STATUS.down) {

				this.y += this.speed

				if (this.y >= this.canvasHeight - this.height)

					this.y = this.canvasHeight - this.height;

			}
			// Finish by redrawing the ship

			this.draw();

		}
		if (KEY_STATUS.space && counter >= fireRate) {

			this.fire();

			counter = 0;

		}

	};
	/*

	 * Fires two bullets

	 */

	this.fire = function() {

		this.bulletPool.getTwo(this.x+6, this.y, 3,

		                       this.x+33, this.y, 3);

	};

}

Ship.prototype = new Drawable();
The ship object sets the speed of the ship to 3 pixels per frame and creates the object pool for the ships bullets. It then sets the ships fire rate to be able to shoot once every 15 frames, using counter to determine when it can shoot. The ship has three methods as well: draw, move, and fire.
The draw method just draws the ship to the screen. The move method first increments the counter variable, then determines if the ship has moved based on keyboard input (to be described next). Based on the keyboard input, it moves the ship and then ensures that it doesn’t go off the screen. The ship in our game will only be able to move 1/4 of the way up the screen, so it will use that as the up-most boundary.
The last thing the draw method does is determine if the player is firing using the keyboard input and can fire based on the fire rate. If the ship can fire, it calls the fire() method and resets the counter to 0.
The fire method calls the object pools getTwo() method to get two bullets at once, and positions them just above the two guns of the ship, setting their speed to 3 pixels per frame as well.
To get the keyboard input for the game, we will use a technique developed by Doug McInnes when he created Asteroids for the canvas.
// The keycodes that will be mapped when a user presses a button.

// Original code by Doug McInnes

KEY_CODES = {

  32: 'space',

  37: 'left',

  38: 'up',

  39: 'right',

  40: 'down',

}
// Creates the array to hold the KEY_CODES and sets all their values

// to false. Checking true/flase is the quickest way to check status

// of a key press and which one was pressed when determining

// when to move and which direction.

KEY_STATUS = {};

for (code in KEY_CODES) {

  KEY_STATUS[ KEY_CODES[ code ]] = false;

}

/**

 * Sets up the document to listen to onkeydown events (fired when

 * any key on the keyboard is pressed down). When a key is pressed,

 * it sets the appropriate direction to true to let us know which

 * key it was.

 */

document.onkeydown = function(e) {

  // Firefox and opera use charCode instead of keyCode to

  // return which key was pressed.

  var keyCode = (e.keyCode) ? e.keyCode : e.charCode;

  if (KEY_CODES[keyCode]) {

    e.preventDefault();

    KEY_STATUS[KEY_CODES[keyCode]] = true;

  }

}

/**

 * Sets up the document to listen to ownkeyup events (fired when

 * any key on the keyboard is released). When a key is released,

 * it sets teh appropriate direction to false to let us know which

 * key it was.

 */

document.onkeyup = function(e) {

  var keyCode = (e.keyCode) ? e.keyCode : e.charCode;

  if (KEY_CODES[keyCode]) {

    e.preventDefault();

    KEY_STATUS[KEY_CODES[keyCode]] = false;

  }

}
The code first creates a JSON object that holds the keycodes for each keyboard key and what that means for our game (ex. left arrow = left). It also creates an array of statuses of true/false so that we know when a key is pressed. It then creates the onkeydown and onkeyup events to trigger the key status change of a key.
The Final Step
The last thing we need to do to is update the game object and the animate function.
 /**

 * Creates the Game object which will hold all objects and data for

 * the game.

 */

function Game() {

	/*

	 * Gets canvas information and context and sets up all game

	 * objects.

	 * Returns true if the canvas is supported and false if it

	 * is not. This is to stop the animation script from constantly

	 * running on browsers that do not support the canvas.

	 */

	this.init = function() {

		// Get the canvas elements

		this.bgCanvas = document.getElementById('background');

		this.shipCanvas = document.getElementById('ship');

		this.mainCanvas = document.getElementById('main');
		// Test to see if canvas is supported. Only need to

		// check one canvas

		if (this.bgCanvas.getContext) {

			this.bgContext = this.bgCanvas.getContext('2d');

			this.shipContext = this.shipCanvas.getContext('2d');

			this.mainContext = this.mainCanvas.getContext('2d');
			// Initialize objects to contain their context and canvas

			// information

			Background.prototype.context = this.bgContext;

			Background.prototype.canvasWidth = this.bgCanvas.width;

			Background.prototype.canvasHeight = this.bgCanvas.height;
			Ship.prototype.context = this.shipContext;

			Ship.prototype.canvasWidth = this.shipCanvas.width;

			Ship.prototype.canvasHeight = this.shipCanvas.height;
			Bullet.prototype.context = this.mainContext;

			Bullet.prototype.canvasWidth = this.mainCanvas.width;

			Bullet.prototype.canvasHeight = this.mainCanvas.height;
			// Initialize the background object

			this.background = new Background();

			this.background.init(0,0); // Set draw point to 0,0
			// Initialize the ship object

			this.ship = new Ship();

			// Set the ship to start near the bottom middle of the canvas

			var shipStartX = this.shipCanvas.width/2 - imageRepository.spaceship.width;

			var shipStartY = this.shipCanvas.height/4*3 + imageRepository.spaceship.height*2;

			this.ship.init(shipStartX, shipStartY, imageRepository.spaceship.width,

			               imageRepository.spaceship.height);
			return true;

		} else {

			return false;

		}

	};
	// Start the animation loop

	this.start = function() {

		this.ship.draw();

		animate();

	};

}
/**

 * The animation loop. Calls the requestAnimationFrame shim to

 * optimize the game loop and draws all game objects. This

 * function must be a gobal function and cannot be within an

 * object.

 */

function animate() {

	requestAnimFrame( animate );

	game.background.draw();

	game.ship.move();

	game.ship.bulletPool.animate();

}
The game gets each canvases information and sets each objects canvas accordingly. It then initializes the background and the ship object, placing it near the bottom middle of the canvas to start.
The animate function just needs to call the move() function and the object pool animate() function to have them animate.
Whew, that’s it! You should now have a game with a ship being able to move and shoot.
Conclusion
That was a pretty long tutorial, but there were a lot of good techniques discussed, such as object pools, dirty boxing, and multiple canvases. Each of these techniques help to increase the performance of our game and ensure we can maintain 60FPS.
In the next tutorial, we’ll create the enemy ships and give them a pattern to move on the screen, as well as a shooting pattern.