Create a Canvas Tileset Background
In this article, we’ll learn how to create a background for an HTML5 canvas using a tileset.
I was asked how to create a background for an HTML5 canvas game using a tileset. Instead of just answering the question in the comments, I decided that it’d probably be a good idea to write a quick tutorial on how to create a simple tileset engine for your game.
See the full demo here.
Tilesets
There are a lot of advantages of using tilesets for a 2D game. Speed and having less files are probably the most prominent of these advantages. But for how nice tilesets are and for how long they have been used in games (The Legend of Zelda: A Link to the Past used them), there doesn’t seem to be any stand alone code for creating a game using them. There are a couple of programs that use tilesets engines, such as RPG Maker or ImpactJS, but if you don’t want to use an entire program to make your game, there’s not much out there (except this one).
So let’s create one that you can use in your game.
Tileset Image
The first thing we need to create a tileset background is a tileset. You can make your own or get free ones from online. I got this one from Lost Garden.
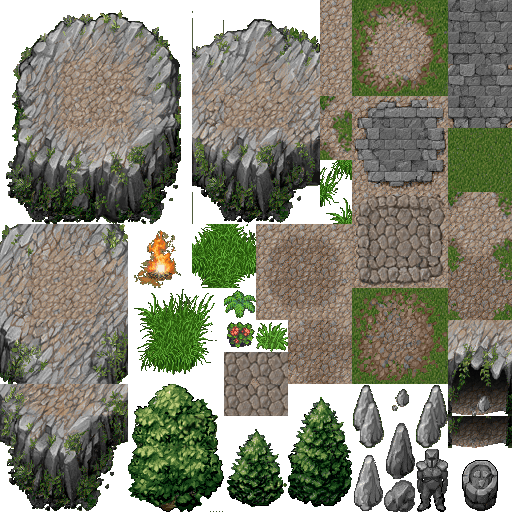
I like to visually divide my tileset into its individual tiles and label each one in order. This helps me to easily see what number I need for which tile when I create my map.
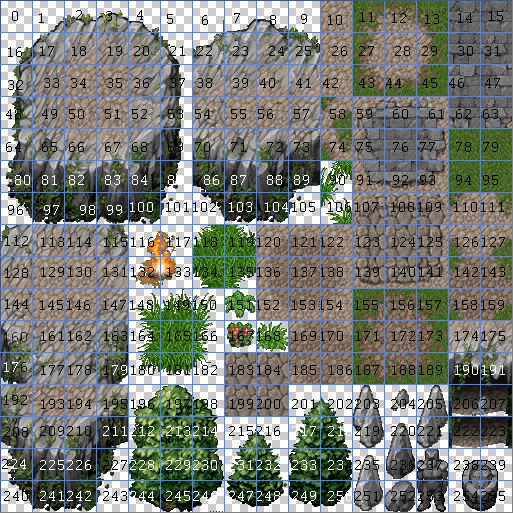
Once we have a tileset, we need to set up the structure that our game will use to create the tileset background. The easiest way to do this is use a 2D array that holds an array of numbers, with each number representing a tile (hence labeling the image for ease of use). We can then loop through the array and draw each tile as we go, thus creating a background.
The number of rows and columns in the 2D array depends on your game. For this tutorial, we’ll create a background that has 32 columns and 20 rows (only because I conveniently have the code from another project). Using the image from above, that creates a background of size 1024×640 since each of the tiles in the tileset is 32×32.
Creating the 2D array is honestly the hardest part of creating a background, only because it is so time-consuming. This is why there are programs to help you create them. They use a visual editor so that you can select the tile you want and then place it where you want it. These programs use a 2D array behind the scenes, but they do all the hard work for you. But since we don’t have a program to create it for us, we have to do it by hand. This means manually entering each tile’s number into the 2D array where we want it for the background.
To save you some time, here is an array with some tiles filled in.
var ground = [

 [172, 172, 172, 79, 34, 34, 34, 34, 34, 34, 34, 34, 56, 57, 54, 55, 56, 147, 67, 67, 68, 79, 79, 171, 172, 172, 173, 79, 79, 55, 55, 55],

 [172, 172, 172, 79, 34, 34, 34, 34, 34, 34, 146, 79, 79, 79, 79, 79, 79, 79, 79, 79, 79, 79, 155, 142, 172, 159, 189, 79, 79, 55, 55, 55],

 [172, 172, 172, 79, 79, 34, 34, 34, 34, 34, 79, 79, 79, 79, 79, 79, 79, 79, 79, 79, 79, 79, 171, 172, 159, 189, 79, 79, 79, 55, 55, 55],

 [188, 188, 188, 79, 79, 79, 79, 34, 34, 34, 36, 172, 172, 143, 142, 157, 79, 79, 79, 79, 79, 79, 187, 159, 189, 79, 79, 79, 55, 55, 55, 55],

 [79, 79, 79, 79, 79, 79, 79, 79, 34, 34, 36, 172, 159, 158, 172, 143, 157, 79, 79, 79, 79, 79, 79, 79, 79, 79, 39, 51, 51, 51, 55, 55],

 [79, 79, 79, 79, 79, 79, 79, 79, 79, 34, 36, 172, 143, 142, 172, 172, 143, 157, 79, 79, 79, 79, 79, 79, 79, 79, 79, 79, 79, 79, 79, 55],

 [79, 79, 79, 79, 79, 79, 79, 79, 79, 34, 52, 172, 172, 172, 172, 172, 172, 143, 156, 157, 79, 79, 79, 79, 79, 79, 79, 79, 79, 79, 79, 79],

 [79, 79, 79, 79, 79, 79, 79, 79, 79, 34, 52, 172, 172, 172, 172, 172, 172, 159, 188, 189, 79, 79, 79, 79, 79, 171, 172, 172, 173, 79, 79, 79],

 [79, 79, 79, 79, 79, 79, 79, 79, 79, 79, 79, 188, 158, 172, 172, 172, 172, 173, 79, 79, 79, 79, 79, 79, 79, 187, 158, 159, 189, 79, 79, 79],

 [79, 79, 79, 79, 79, 79, 79, 79, 79, 79, 79, 79, 171, 172, 172, 159, 188, 189, 79, 79, 79, 79, 79, 79, 79, 79, 171, 173, 79, 79, 79, 79],

 [79, 79, 79, 79, 79, 79, 79, 79, 79, 79, 79, 79, 171, 172, 172, 173, 79, 79, 79, 79, 79, 79, 79, 79, 79, 79, 171, 173, 79, 79, 79, 79],

 [155, 142, 157, 79, 79, 79, 79, 79, 79, 79, 79, 79, 187, 188, 188, 189, 79, 79, 79, 79, 79, 79, 79, 79, 79, 79, 171, 173, 79, 79, 79, 79],

 [171, 172, 173, 79, 79, 79, 79, 79, 79, 79, 79, 79, 79, 79, 79, 79, 79, 79, 79, 79, 79, 79, 79, 79, 79, 79, 171, 173, 79, 79, 79, 79],

 [171, 172, 143, 156, 157, 79, 79, 79, 79, 79, 79, 79, 79, 79, 79, 79, 79, 79, 79, 79, 79, 79, 79, 79, 79, 79, 187, 189, 79, 79, 79, 79],

 [187, 188, 158, 172, 173, 79, 79, 79, 79, 79, 79, 79, 79, 79, 79, 79, 79, 79, 79, 79, 79, 79, 79, 79, 79, 79, 79, 79, 79, 79, 79, 79],

 [79, 79, 79, 188, 189, 79, 79, 79, 79, 79, 79, 155, 156, 156, 157, 79, 79, 79, 79, 79, 79, 79, 79, 79, 79, 79, 79, 79, 79, 79, 155, 156],

 [34, 34, 79, 79, 79, 79, 79, 79, 79, 79, 79, 171, 172, 172, 173, 79, 79, 79, 79, 79, 79, 79, 79, 79, 79, 79, 79, 79, 79, 155, 142, 172],

 [34, 34, 34, 79, 79, 79, 79, 79, 79, 79, 79, 171, 172, 172, 173, 79, 79, 79, 79, 79, 79, 79, 79, 79, 79, 79, 79, 79, 79, 171, 172, 172],

 [34, 34, 34, 34, 79, 79, 79, 79, 79, 79, 155, 172, 172, 159, 189, 79, 79, 79, 79, 79, 79, 79, 79, 79, 79, 79, 79, 79, 79, 171, 172, 172],

 [34, 34, 34, 34, 34, 34, 79, 79, 79, 79, 171, 172, 172, 173, 79, 79, 79, 79, 79, 79, 79, 79, 79, 79, 79, 79, 79, 79, 155, 142, 172, 172]

 ];
Tileset Engine
With our array in hand, we now need to generate the background. Our tileset engine needs to do three things:
- Loop through each number in the array
- Translate the number into a row and column of where the tile starts in the tileset image
- Draw the tile to the canvas at the row and column of the number in the array
So first, looping over the array.
var tilesetImage = new Image();

tilesetImage.src = 'path/to/image.png';

tilesetImage.onload = drawImage;
var canvas = document.getElementById('main');

var ctx = canvas.getContext('2d');

var tileSize = 32;       // The size of a tile (32×32)

var rowTileCount = 20;   // The number of tiles in a row of our background

var colTileCount = 32;   // The number of tiles in a column of our background

var imageNumTiles = 16;  // The number of tiles per row in the tileset image
function drawImage () {

   for (var r = 0; r < rowTileCount; r++) {

      for (var c = 0; c < colTileCount; c++) {

         var tile = ground[ r ][ c ];

         // Steps 2 and 3

      }

   }

}
Next, we calculate the row and column of the tile. This is actually quite simple to do. To find the row of the tile, we divide the number by the number of tiles per row (16) and round down. To calculate the column of the tile, we mod (%) the number by the number of tiles per row and round down.
For example, lets get the row and column of the tile labeled 10. The tile starts at row 0 and column 10 (which is the 1st row and the 11th column, but since we’re 0 indexed we need to start all our counts at 0 instead of 1). Using our formula, row = Math.floor(10 / 16) = Math.floor(0.625) = 0 and col = Math.floor(10 % 16) = Math.floor(10) = 10.
var tileRow = (tile / imageNumTiles) | 0; // Bitwise OR operation

var tileCol = (tile % imageNumTiles) | 0;
The bitwise OR operation ( | 0) does the same thing as Math.floor, but is faster.
Lastly, we need to draw the 32×32 tile to the canvas. Conveniently, the canvas API provides the ability to do this in the drawImage() function. By defining the clipping area, we can draw only the section of the image that we want and not the entire image.
To translate the row and column of the tile into an x and y coordinate of the image, we just multiply each by the size of a tile. When we draw the image to the canvas, we do the same thing for r and c to draw the tile at the correct position on the background.
ctx.drawImage(tilesetImage, (tileCol * tileSize), (tileRow * tileSize), tileSize, tileSize, (c * tileSize), (r * tileSize), tileSize, tileSize);
Putting it all together, we get:
var tilesetImage = new Image();

tilesetImage.src = 'path/to/image.png';

tilesetImage.onload = drawImage;
var canvas = document.getElementById('main');

var ctx = canvas.getContext('2d');

var tileSize = 32;       // The size of a tile (32×32)

var rowTileCount = 20;   // The number of tiles in a row of our background

var colTileCount = 32;   // The number of tiles in a column of our background

var imageNumTiles = 16;  // The number of tiles per row in the tileset image
function drawImage () {

   for (var r = 0; r < rowTileCount; r++) {

      for (var c = 0; c < colTileCount; c++) {

         var tile = ground[ r ][ c ];

         var tileRow = (tile / imageNumTiles) | 0; // Bitwise OR operation

         var tileCol = (tile % imageNumTiles) | 0;

         ctx.drawImage(tilesetImage, (tileCol * tileSize), (tileRow * tileSize), tileSize, tileSize, (c * tileSize), (r * tileSize), tileSize, tileSize);

      }

   }

}
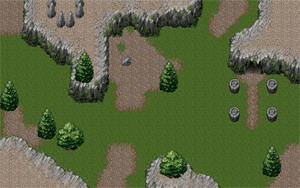
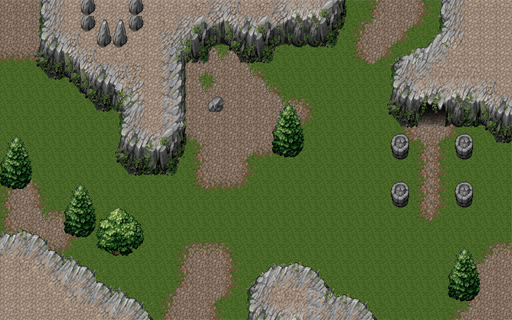
And when we run all the code with the 2D array, we should end up with this image on the canvas.
Layering Tiles
As you can see, the background we drew isn’t very interesting. It looks pretty terrible actually. The 2D array can’t hold more than one tiles information per location, so we couldn’t draw more than one tile per square of our background. To make our background really shine, we need to layer it with more details.
As you might imagine, layering just requires the use of another 2D array, one that will be drawn on top of the first array.
var layer1 = [

 [0, 0, 32, 33, 0, 236, 0, 0, 236, 0, 0, 0, 0, 0, 0, 0, 0, 0, 0, 0, 0, 69, 0, 0, 0, 0, 0, 32, 33],

 [0, 0, 48, 49, 0, 236, 220, 220, 236, 0, 0, 147, 72, 73, 70, 71, 72, 73, 83, 83, 84, 85, 0, 0, 0, 0, 0, 48, 49],

 [0, 0, 64, 65, 54, 0, 236, 236, 0, 0, 162, 163, 84, 89, 86, 87, 88, 89, 99, 99, 100, 101, 0, 0, 0, 0, 7, 112, 113],

 [0, 0, 80, 81, 70, 54, 55, 50, 0, 0, 0, 179, 100, 105, 102, 103, 104, 105, 0, 0, 0, 0, 0, 0, 16, 22, 23, 39],

 [0, 0, 96, 97, 86, 70, 65, 144, 193, 0, 0, 37, 0, 0, 0, 0, 0, 0, 0, 0, 0, 0, 0, 0, 48, 49],

 [0, 0, 0, 0, 102, 86, 81, 160, 161, 0, 0, 37, 0, 0, 0, 0, 0, 0, 0, 0, 0, 0, 0, 0, 64, 65, 174, 175, 67, 66, 54],

 [0, 0, 0, 0, 0, 102, 97, 176, 177, 0, 0, 37, 0, 252, 0, 0, 0, 201, 202, 0, 0, 0, 0, 0, 80, 81, 190, 191, 83, 82, 70, 71],

 [0, 0, 0, 0, 0, 0, 0, 48, 49, 0, 0, 53, 0, 0, 0, 0, 0, 217, 218, 0, 0, 0, 0, 0, 96, 97, 222, 223, 99, 98, 86, 87],

 [201, 202, 0, 0, 0, 0, 0, 64, 65, 66, 68, 69, 0, 0, 0, 0, 0, 233, 234, 0, 0, 0, 0, 0, 238, 239, 0, 0, 238, 239, 102, 103],

 [217, 218, 0, 0, 0, 0, 0, 80, 81, 82, 84, 85, 0, 0, 0, 0, 0, 249, 250, 0, 0, 0, 0, 0, 254, 255, 0, 0, 254, 255],

 [233, 234, 0, 0, 0, 0, 0, 96, 97, 98, 100, 101, 0, 0, 0, 0, 0, 0, 0],

 [249, 250, 0, 0, 201, 202, 0, 0, 0, 0, 0, 0, 0, 0, 0, 0, 0, 0, 0, 0, 0, 0, 0, 0, 238, 239, 0, 0, 238, 239],

 [0, 0, 0, 0, 217, 218, 0, 0, 0, 0, 0, 0, 0, 0, 0, 0, 0, 0, 0, 0, 0, 0, 0, 0, 254, 255, 0, 0, 254, 255],

 [0, 0, 0, 0, 233, 234, 196, 197, 198],

 [2, 3, 4, 0, 249, 250, 228, 229, 230],

 [18, 19, 20, 8, 0, 0, 244, 245, 246, 0, 0, 0, 0, 0, 0, 0, 0, 0, 0, 0, 0, 0, 0, 0, 0, 0, 0, 0, 201, 202],

 [0, 35, 40, 24, 25, 8, 9, 0, 0, 0, 0, 0, 0, 0, 0, 0, 1, 2, 3, 4, 0, 0, 0, 0, 0, 0, 0, 0, 217, 218],

 [0, 0, 0, 40, 41, 20, 8, 9, 0, 0, 0, 0, 0, 0, 0, 16, 17, 18, 19, 20, 21, 0, 0, 0, 0, 0, 0, 0, 233, 234],

 [0, 0, 0, 0, 40, 19, 24, 25, 8, 9, 0, 0, 0, 0, 0, 48, 49, 50, 51, 52, 115, 3, 4, 0, 0, 0, 0, 0, 249, 250],

 [0, 0, 0, 0, 0, 0, 40, 41, 20, 21, 0, 0, 0, 0, 0, 64, 65, 66, 67, 52, 19, 19, 20, 21]

 ];
And in our loop, we just add the new layer to be drawn.
for (var r = 0; r < rowTileCount; r++) {

   for (var c = 0; c < colTileCount; c++) {

      var tile = ground[ r ][ c ];

      var tileRow = (tile / imageNumTiles) | 0; // Bitwise OR operation

      var tileCol = (tile % imageNumTiles) | 0;

      ctx.drawImage(tilesetImage, (tileCol * tileSize), (tileRow * tileSize), tileSize, tileSize, (c * tileSize), (r * tileSize), tileSize, tileSize);
      tile = layer1[ r ][ c ];

      tileRow = (tile / imageNumTiles) | 0;

      tileCol = (tile % imageNumTiles) | 0;

      ctx.drawImage(tilesetImage, (tileCol * tileSize), (tileRow * tileSize), tileSize, tileSize, (c * tileSize), (r * tileSize), tileSize, tileSize);

   }

}
You can add as many layers as you need to create the image you desire.
Conclusion
Tilesets are a great way to create great looking maps without having to create individual images per map. By being able to reuse tiles, the number of files needed for a game is reduced and the speed at which the game can render and load is increased. This simple tileset engine can be used in any of your games to create a tileset background.